
Attaching FPV props to motors is easy if done right.
- Identify motor rotation (CW/CCW)
- Match props to correct motors
- And choose the proper mounting method—prop nuts, T-mount, or press-fit.
- Align the props on motor shafts, secure them using prop nuts or screws
Always check prop orientation, top/bottom, and tightness for safe, stable FPV flights.
👉 Explore the collection of FPV Propellers on MEPSKING.
Why Properly Attaching Props Matters in FPV Builds
Correctly installing your FPV propellers is crucial for:
- Flight performance: Properly attached props reduce vibration and improve thrust efficiency.
- Safety: Loose props can fly off mid-air, causing crashes or injuries.
- Component longevity: Correct tension prevents damage to motor shafts and bearings.
Whether you’re a beginner or a seasoned FPV pilot, mastering prop installation is a must.
See the guide to help you choose the best FPV propellers: Choose Best Suitable Propellers for Your FPV.
Tools and Parts You’ll Need
Before attaching your FPV props to motors, prepare these tools and parts:
- A set of FPV propellers (CW and CCW pairs)
- FPV motors (brushless motors with threaded shafts or T-mounts)
- Prop nuts or screws (depending on motor type)
- A prop nut wrench or driver tool: Usually a spanner or socket wrench for 8mm prop tool
- Safety gear (gloves and goggles)
Having the right tools ensures you can attach props to FPV motors safely and without stripping the threads.
Understand FPV Drone Motor Rotation
Before you FPV attach props to motors, you must understand how your drone motor and propeller system works. Each motor is designed to spin in a specific direction, and mounting the wrong prop on the wrong motor will cause your drone to flip instantly on takeoff.
FPV Drone Motor Direction — CW & CCW
Every FPV quad uses two pairs of motors arranged diagonally and rotating in the same direction:
- Clockwise (CW) rotation
- Counterclockwise (CCW) rotation
This alternating layout balances torque and keeps your drone stable in the air. Matching motor spin to the correct prop is crucial for safe and controlled flight.
How to Identify Motor Rotation?
Before installing props, confirm your FPV drone motor direction:
- Use Betaflight Configurator (or similar flight controller software).
- Go to the Motors tab and spin each motor one by one.
- Watch the direction arrows on screen to see if each motor spins CW or CCW.
Typically, the front-left and rear-right motors spin CCW, while the front-right and rear-left spin CW. Knowing this ensures you match the correct drone prop direction to each motor during installation.
➡️ See our full blog: How to Rotate FPV Motor Direction?


Understand Drone Prop Direction
When learning how to put props on FPV drone, understanding the drone prop direction is absolutely critical.
Mounting your propellers the wrong way can cause unstable lift or even make the drone flip on takeoff. Here’s how to get it right.
Identify the Top and Bottom of the Propeller
To correctly put props on an FPV drone, you first need to recognize which side faces up:
- Top side – Usually glossy or shiny, often has raised text or numbers near the hub showing the model and size.
- Bottom side – Usually matte or dull, with no raised markings.
Make sure the glossy/text side faces up when you install. If you install them upside down, your drone motor and propeller system won’t generate proper lift, and your drone may flip immediately when you arm the motors.
Leading Edge and Trailing Edge
Each FPV propeller blade has two edges that control airflow:
- Leading edge – The higher, sharper edge; it faces the direction of rotation.
- Trailing edge – The lower, smoother edge; it trails behind as the prop spins.
Props are labeled either CW (Clockwise) or CCW (Counterclockwise) to match your FPV drone motor direction. Always align the leading edge with the motor’s spin direction. This simple step ensures your props cut through the air efficiently.
Identify Props Label
Most FPV prop packs include two CW props and two CCW props. They’re designed to spin in opposite directions to cancel out torque:
- Two props spin clockwise, producing clockwise torque.
- Two props spin counterclockwise, producing counter-torque to stabilize the frame.
Before installation, check the labels on the propeller to determine the rotation direction that matches the motor.
Match Prop Direction to Motor Rotation
In every FPV drone build, two motors spin CW and two spin CCW. When you attach props to FPV motors, always:
- Identify the prop’s rotation label (CW or CCW).
- Mount CW props on CW motors, CCW props on CCW motors.
- Make sure the leading edge faces the same way the motor spins.
Example: If a motor spins clockwise, the leading edge of the prop should also face clockwise.
Correctly pairing drone motor and propeller direction is the foundation of stable FPV flight—get this right, and your drone will hover smoothly and respond predictably.

Understanding Props In and Props Out
There are two rotation configurations: Props In or Props Out. This defines the overall drone prop direction and how your FPV drone motor direction pairs with CW and CCW props. The default configuration in Betaflight is Props In, but you can reverse all motors to use Props Out.
- Props In (Regular): The leading edge of each prop faces toward the center of the quad.
- Props Out (Reversed): The leading edge of each prop faces away from the center of the quad.
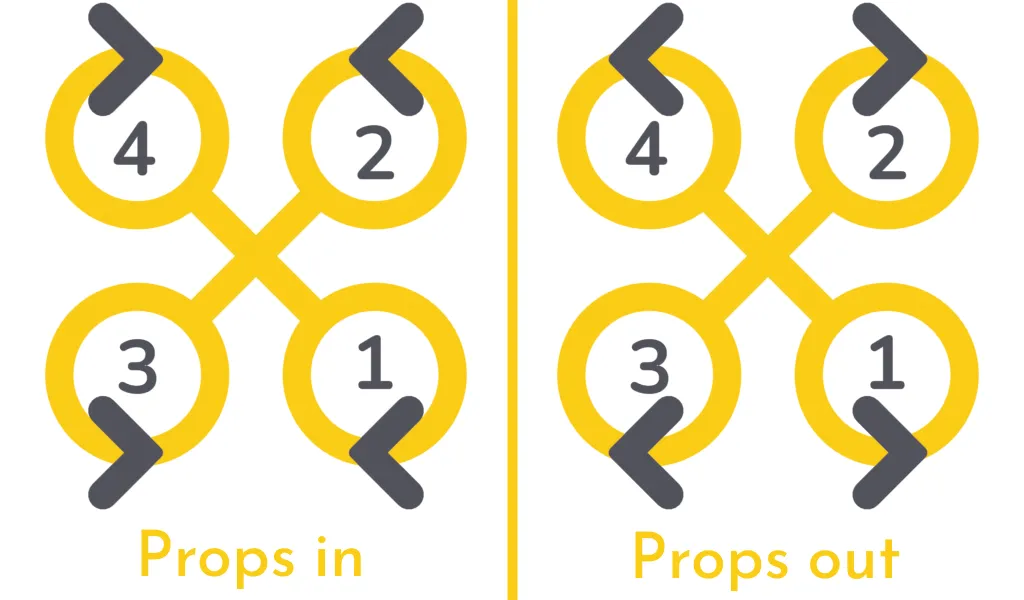
Determine the propeller rotation configuration in Betaflight, then match CW and CCW props to the motors based on their rotation direction.
Three Methods for Attaching Props to Motors
The three most popular mounting techniques for FPV drone motors are press fit, T-mount, and prop nuts. Each variety has benefits and is appropriate for particular drone sizes and uses. Make sure you understand which setup your motors use before picking up propellers to avoid incompatibility.
Prop Nuts
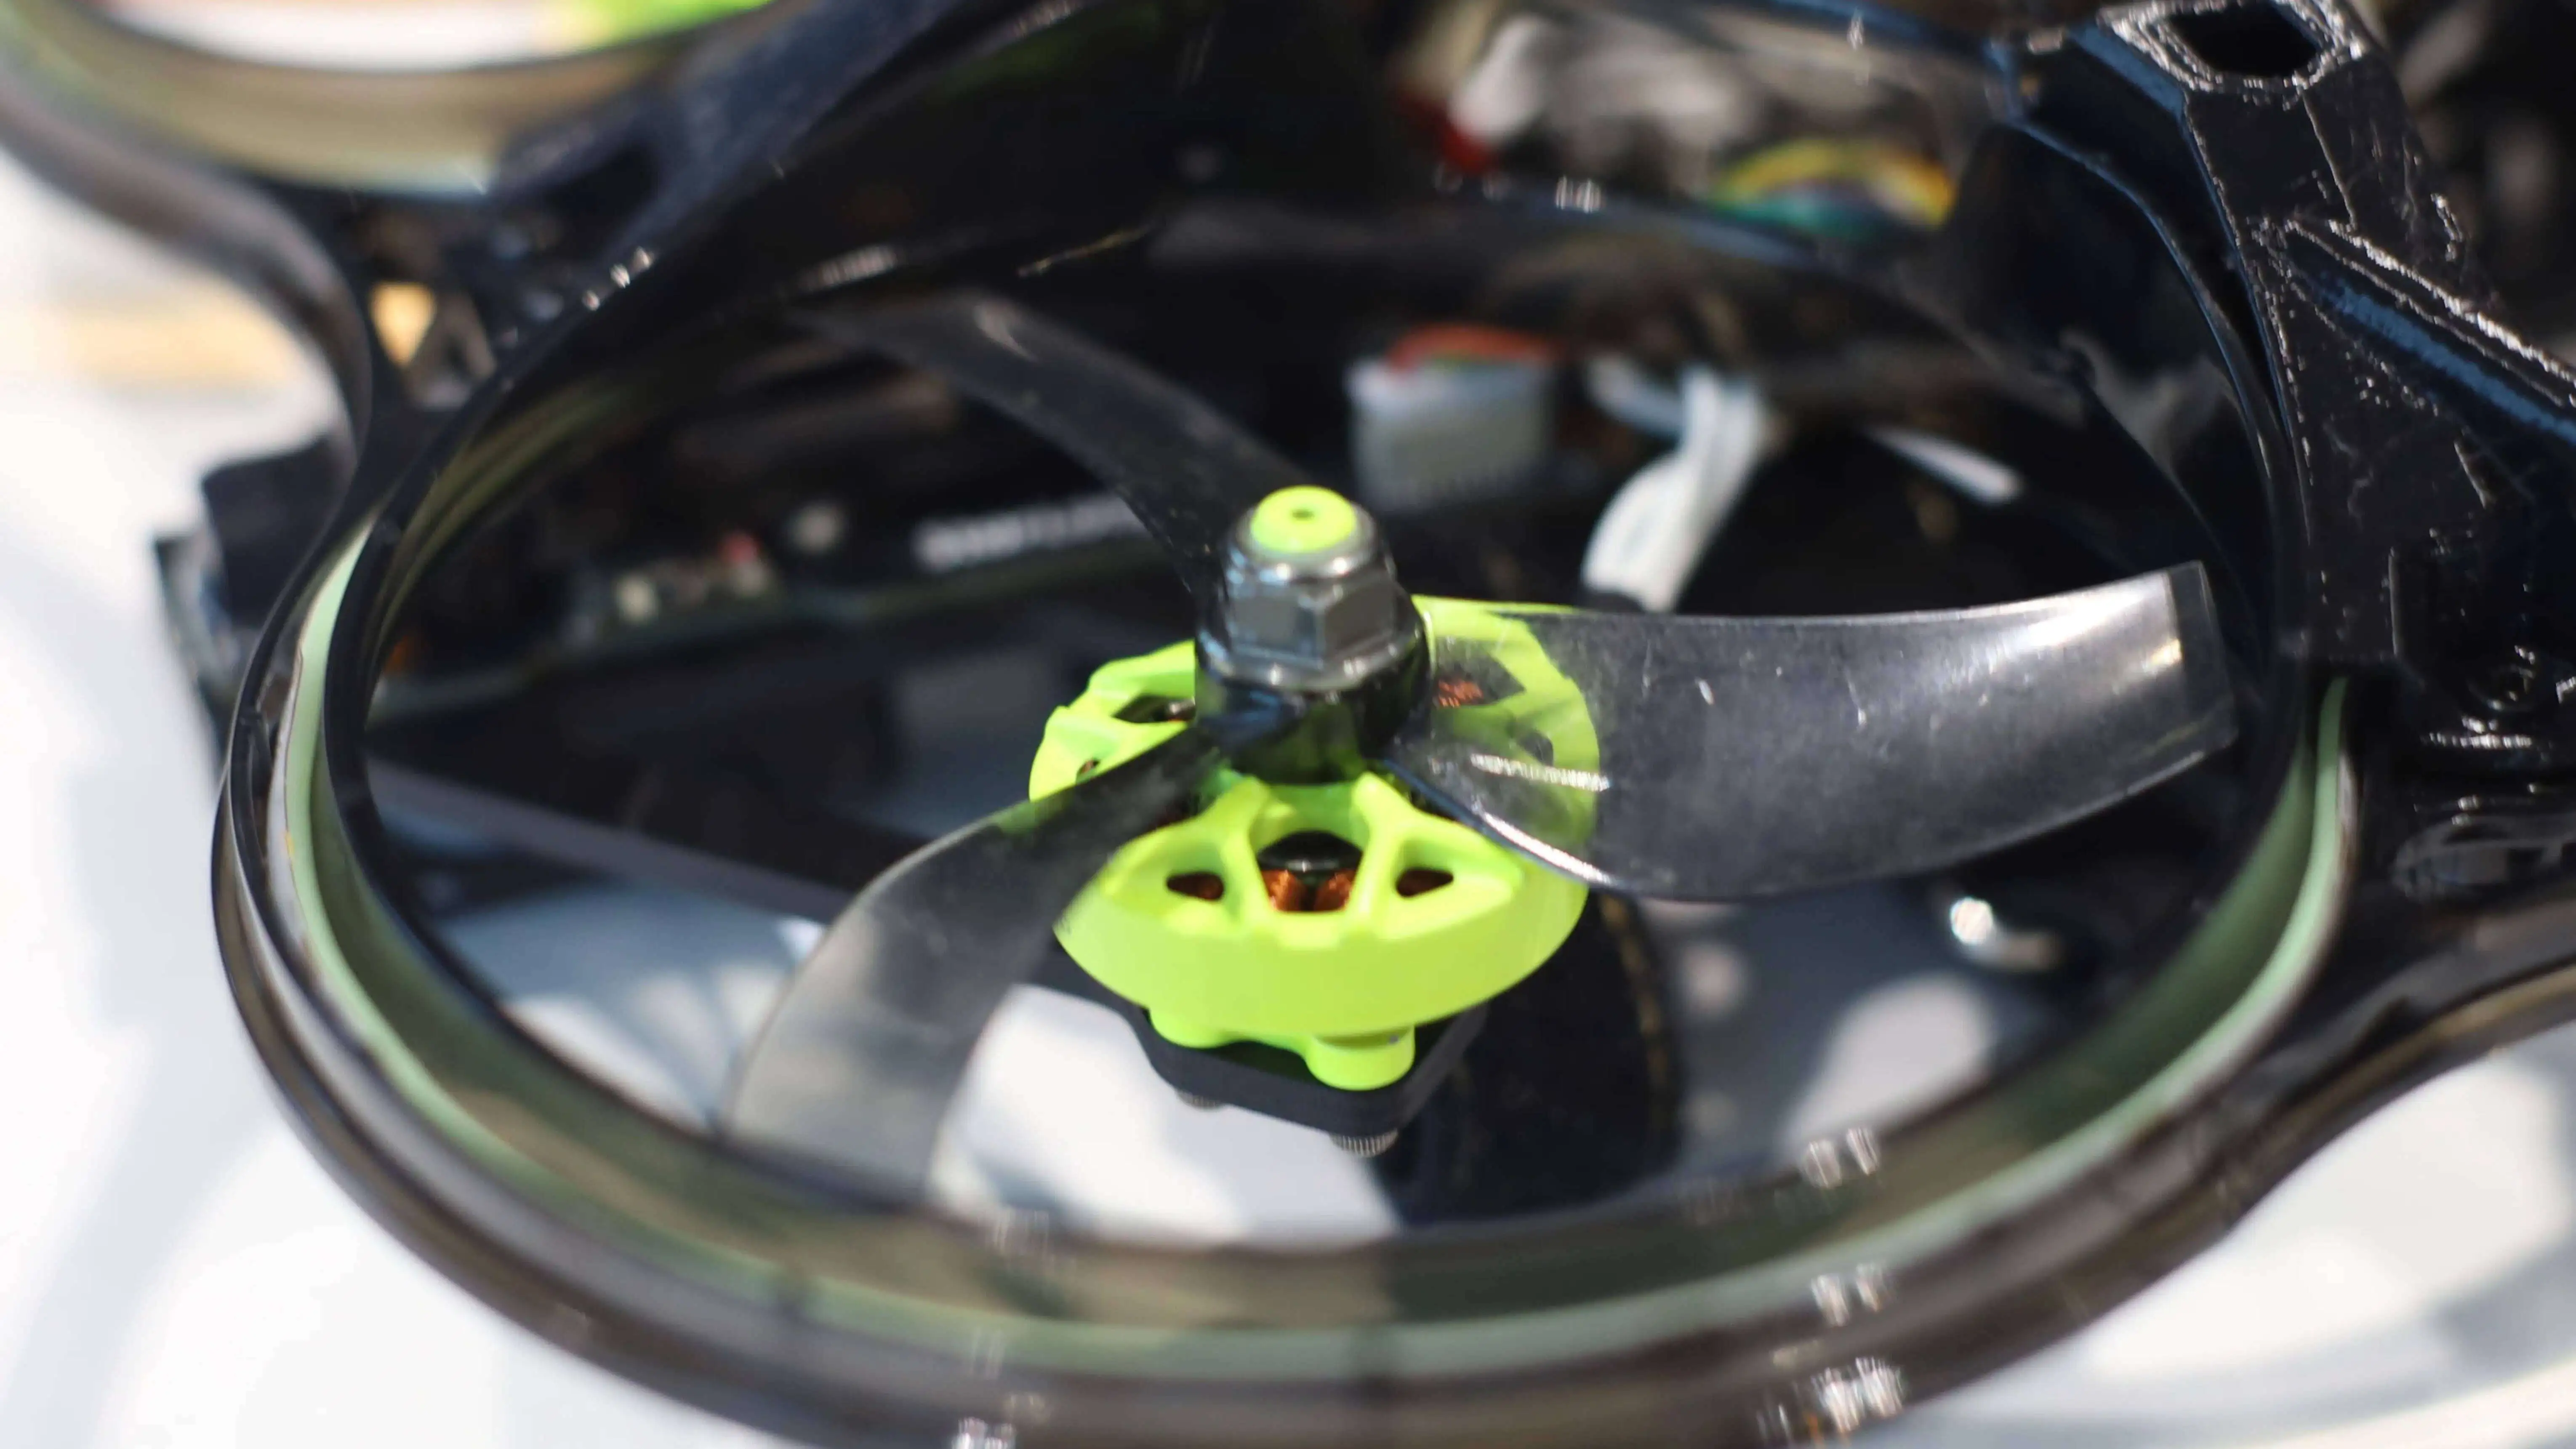
The most popular mounting technique for larger rigs and 5 FPV drones is using prop nuts. Using a self-locking nylon nut, the propeller is fastened to a motor shaft with an M5 thread.
T-Mount
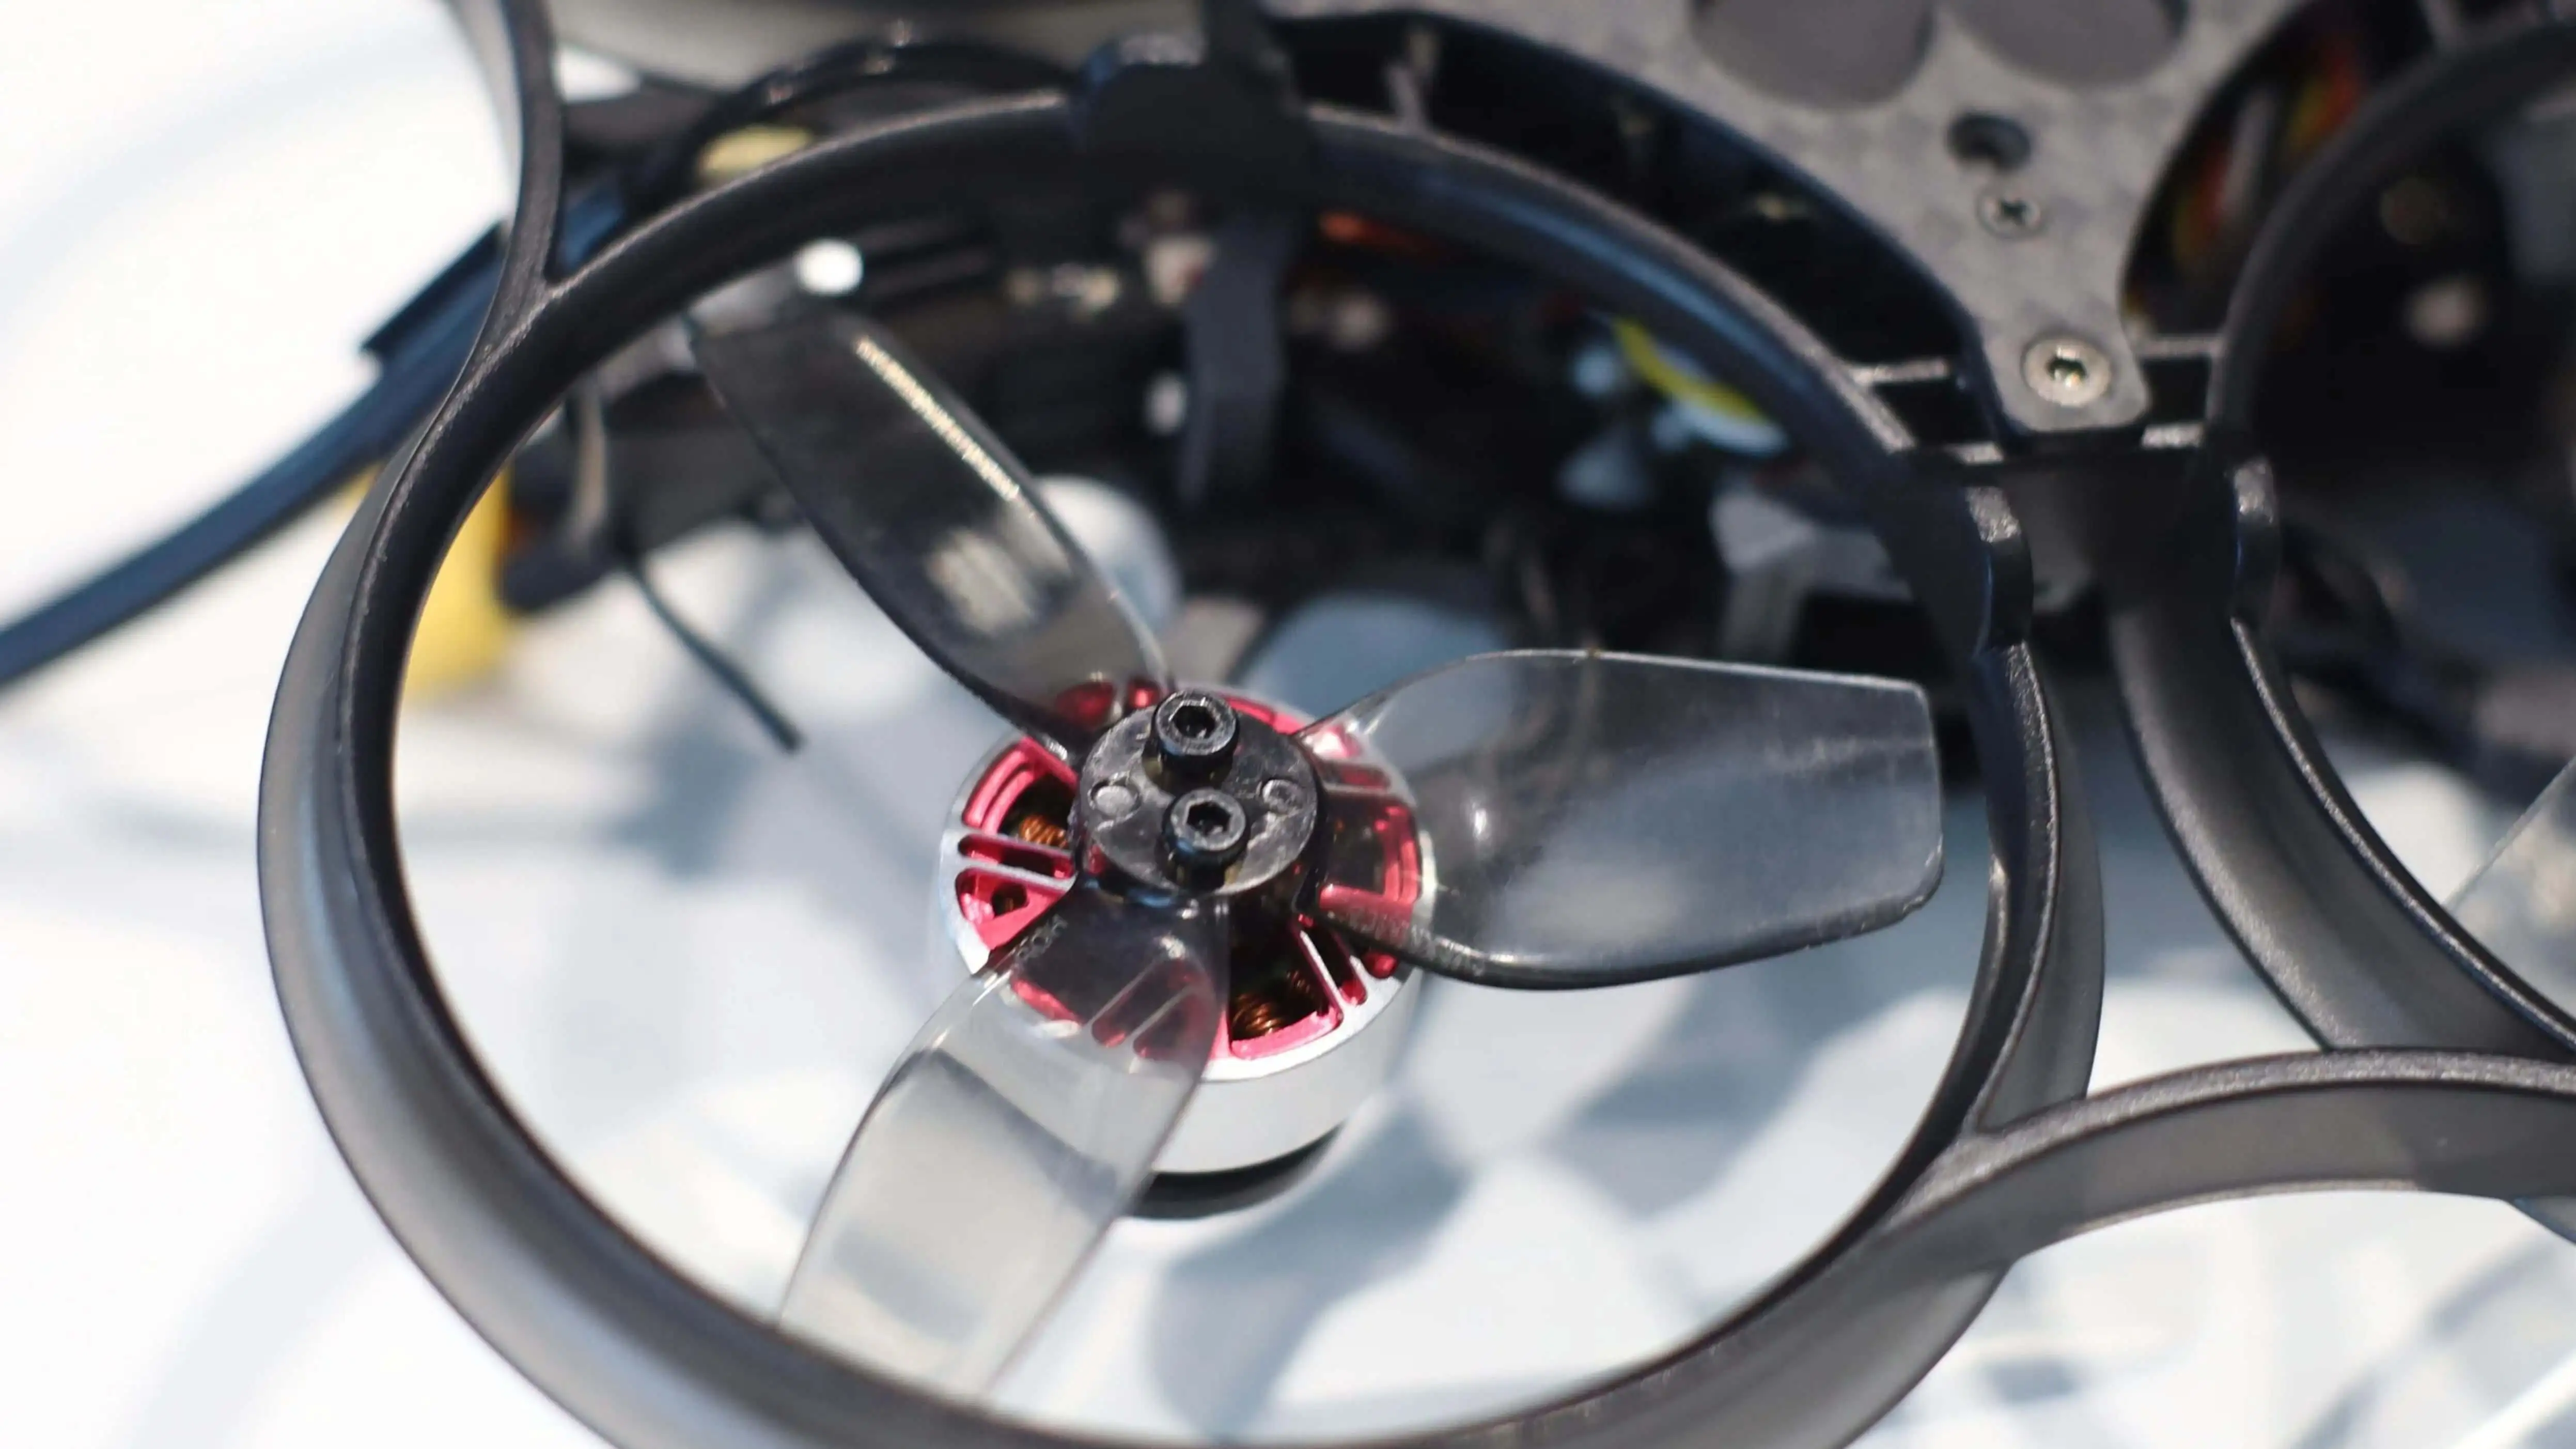
Two tiny M2 screws are used to fasten the propeller to the motor bell in T-Mount configurations. The prop is centered with the aid of the motor shaft, which is usually 1 or 1.5 mm in diameter. For drones that are smaller and have less power, the lightweight design is perfect. It provides a snug fit without the need for big nuts or threaded shafts. This installation is used for small FPV drones, ranging from 2 to 4 inches.
Fit by Pressing
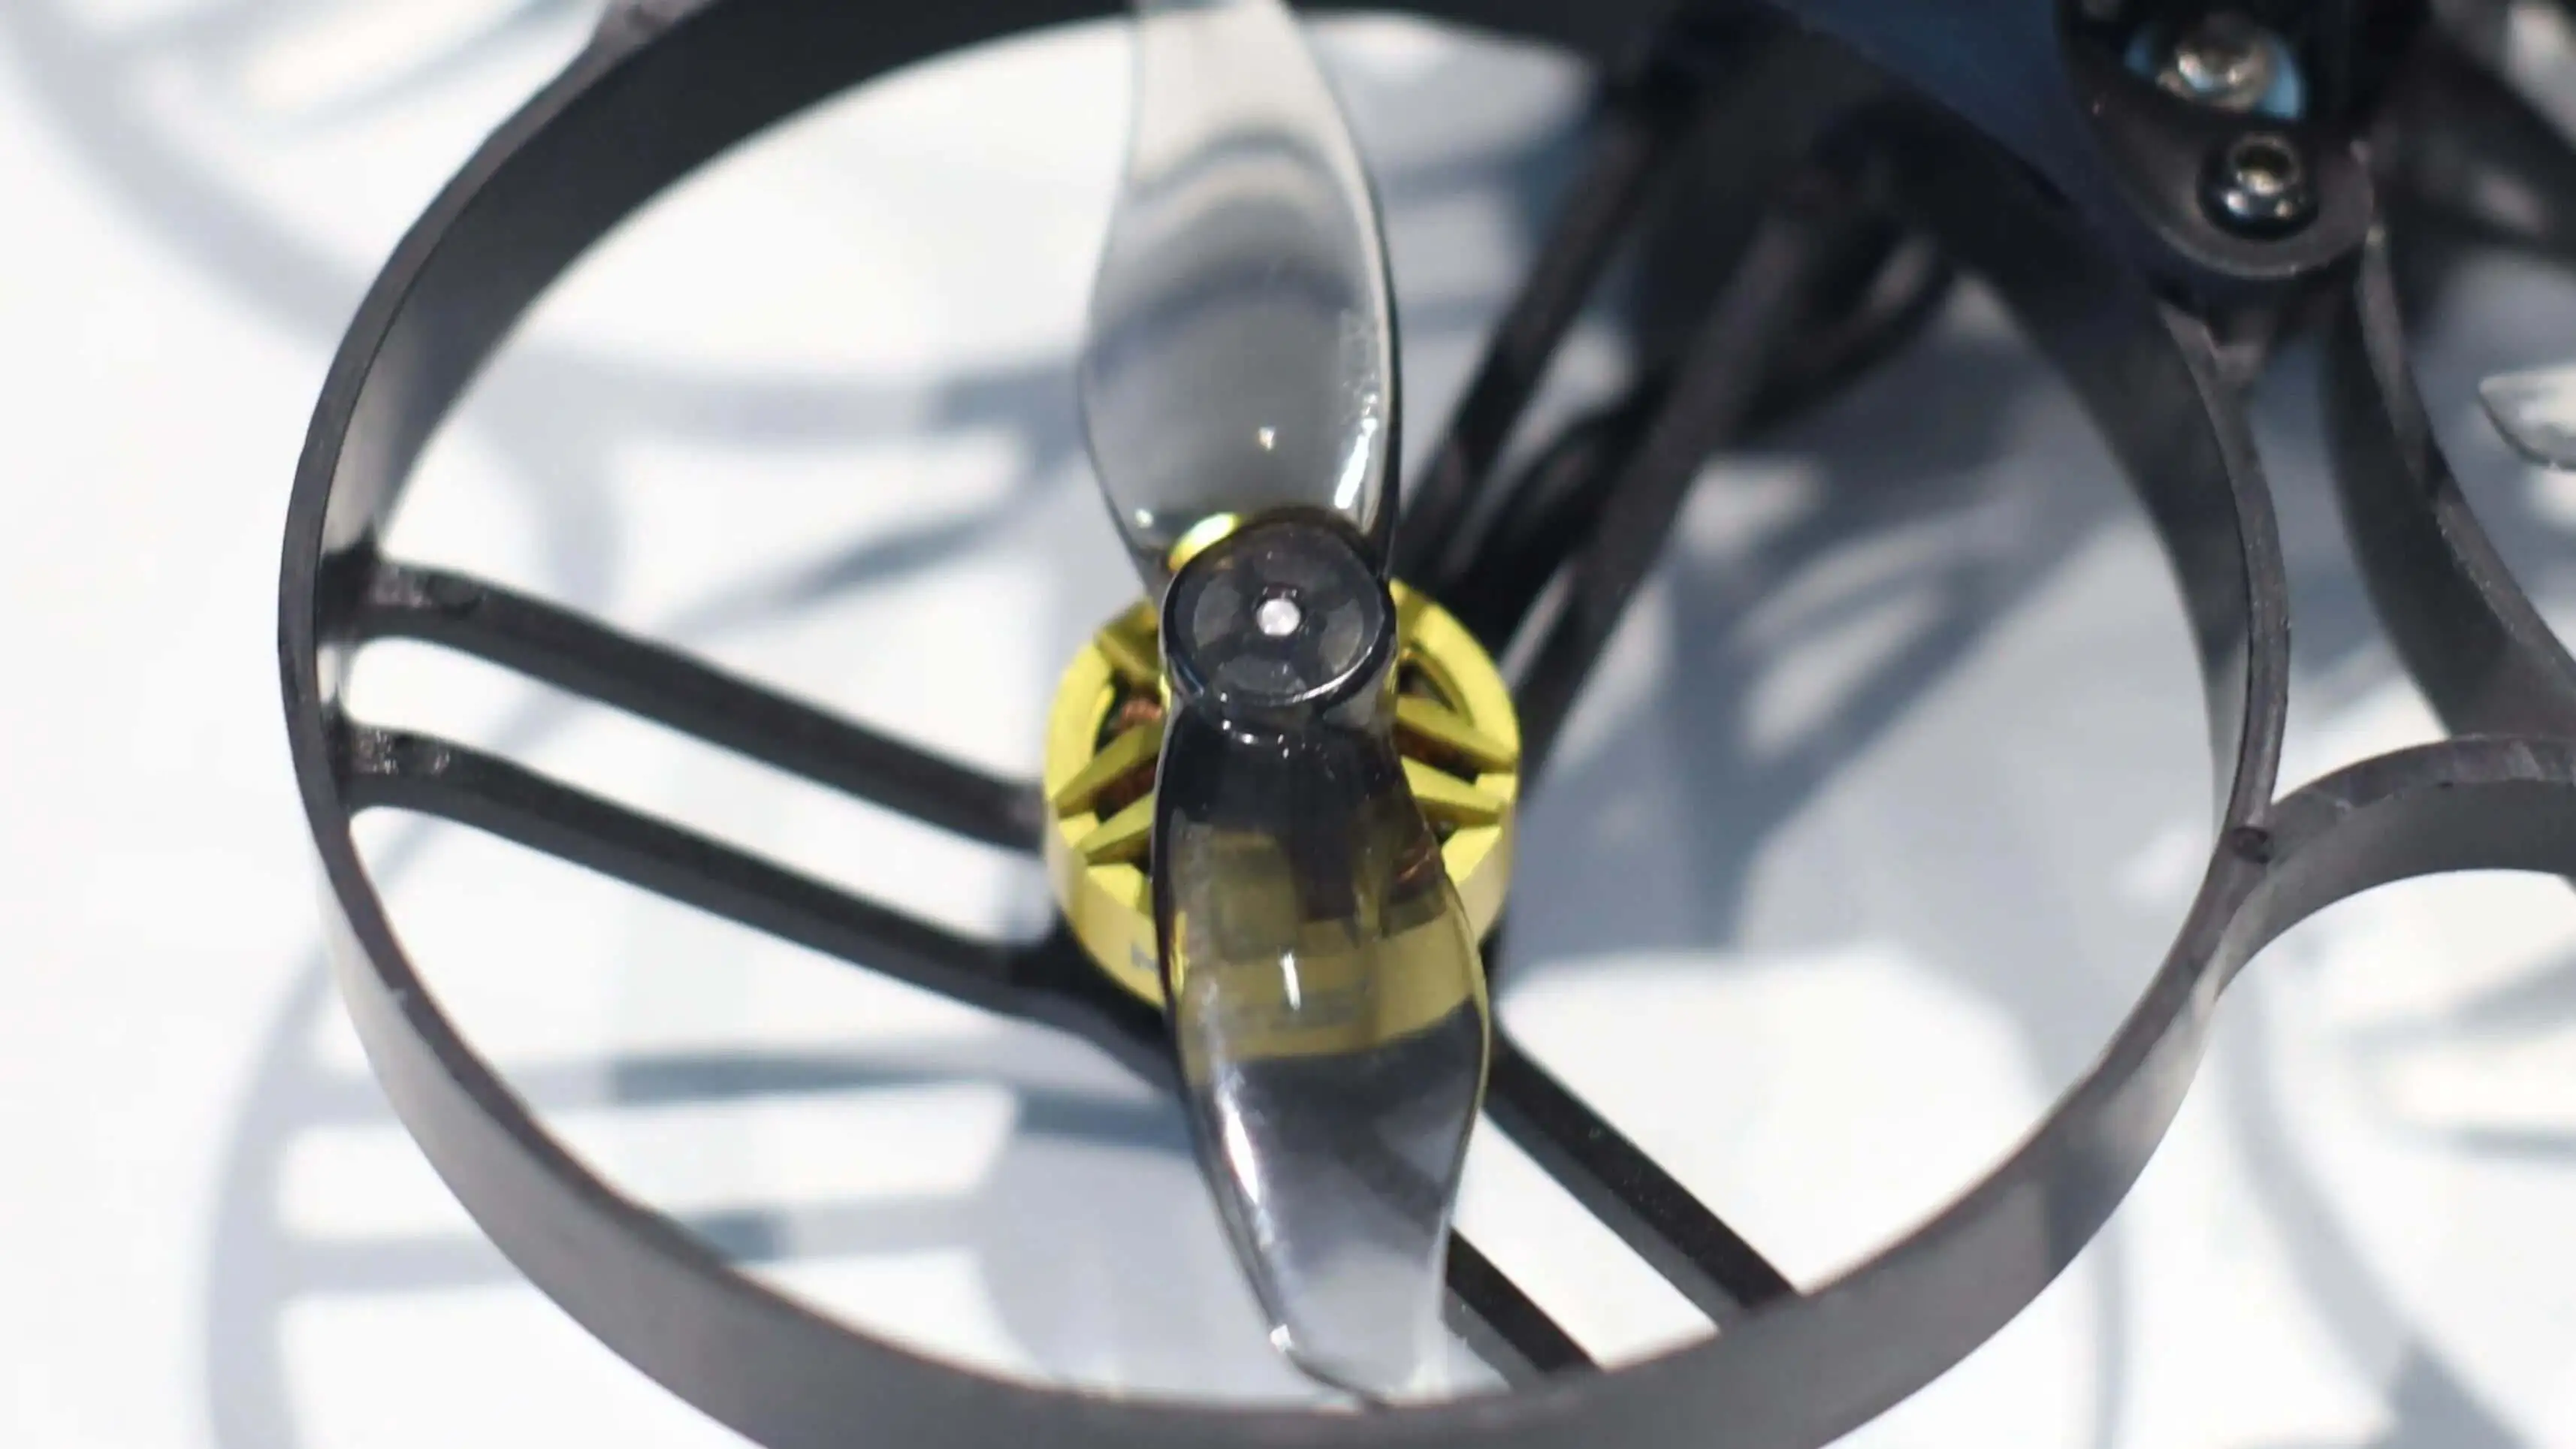
Press-fit mounting involves pushing the propeller onto the motor shaft and holding it there via friction. Motor shafts are commonly 1mm or 1.5mm in diameter. Because there are no screws or nuts required, the propeller can be changed easily and with less weight. Propellers could, however, fly off in crashes or if the engines spin too quickly. This is popular in toothpicks (ultralight) drones and tiny whoops.
Step-by-Step: FPV Attach Props to Motors
Step 1: Confirm Motor Rotation Direction
Before mounting anything, first confirm your FPV drone motor direction in Betaflight.
- By default, Betaflight uses the Props In configuration.
- In this layout:
- Front-left & rear-right motors spin CW
- Front-right & rear-left motors spin CCW
Open the Motors tab in Betaflight Configurator and spin each motor (without props!) to verify its rotation.
Step 2: Match Props to Motors
Next, match the correct drone motor and propeller pairs:
- CW props go on CW motors (front-left and rear-right by default)
- CCW props go on CCW motors (front-right and rear-left by default)

Important:
- Identify the top side of the prop: it’s usually glossy or has raised text (model/size). This side should face up.
- The leading edge of the blade should face the same direction the motor spins.
- If a prop is installed upside down or on the wrong motor, the drone may flip over on takeoff.
Step 3: Attach Props to Motors
Different motors use different mounting systems. Follow the method that matches your setup:
Type 1 – Prop Nuts
- Prepare M5 prop nuts.
- Press the prop down along the 5 mm motor shaft.
- Hand-thread the M5 nut to hold the prop in place.
- Use an 8 mm wrench or socket to tighten the nut clockwise until snug.
�� Tip: Tighten it enough to hold the prop securely, but don’t overtighten—you can deform the prop hub. If you don’t change props often, apply a small amount of thread locker before tightening to prevent loosening.
Type 2 – T-Mount (Screwed)
- Prepare two M2 screws.
- Press the prop evenly onto the 1 mm or 1.5 mm motor shaft.
- Rotate the prop until its mounting holes align with the motor holes.
- Apply a bit of thread locker to the screws, then tighten using a 1.5 mm hex driver.
Type 3 – Press Fit
- Align the prop hub hole with the motor shaft.
- Press the prop firmly down onto the shaft.
- Once fully seated, twist the prop clockwise by hand until it locks with no gap between the hub and rotor.
Step 4: Check Stability
After mounting, always do a quick stability check:
- Hold the motor firmly and try moving the prop by hand.
- If it spins freely or wobbles, tighten it a bit more until it’s fully secure.
Correctly installing your props will give you smooth thrust, predictable handling, and safer FPV flights.
Safety Tips After Mounting Props
- Power off the drone completely while working on the propellers.
- Wear safety goggles to protect your eyes from sudden prop strikes.
- Use thread-lock (Loctite) on prop screws if you fly aggressively or do freestyle tricks.
- Re-check prop tightness before every flight session.
Following these tips reduces the risk of mid-flight prop failures and injuries.
Troubleshooting: Common Prop and Motor Issues
| Problem | Symptom | Solution |
| Wrong prop on motor | Drone flips on takeoff | Swap prop or reverse motor rotation |
| Loose prop nut/screw | Prop flies off midair | Retighten and use thread-lock |
| Cracked or bent prop | Vibration, poor control | Replace prop immediately |
| Prop rubbing frame | Noise or damage | Use shorter props or raise arms |
| Motor spins wrong way | Mismatch thrust | Reverse in BLHeli Configurator |
Final Preflight Checklist
Inspect Propellers for Damage
- Look for chips, cracks, or bent blades — even small damage can cause vibration
- Replace any broken or warped props immediately; flying with damaged propellers risks total loss of control.
Verify Prop Nut Tightness
- Gently twist each prop nut by hand to confirm it’s snug.
- If any feel loose, use your prop tool to tighten them fully before takeoff.
- Loose props can spin off mid-flight, leading to a crash.
Double-Check Motor Direction & Prop Orientation
- Confirm that CW and CCW props are on the correct motors.
- Make sure all props are mounted right-side up with the g
- If you’re unsure, refer to your drone’s motor direction diagram or Betaflight Motors tab.
Safety Tips
- Don’t use Loctite or strong adhesives on prop hardware — they can weaken plastic hubs.
- Perform this checklist before every session.
If everything checks out, you’re ready to fly safely with optimal performance!
FAQs – FPV Attach Props to Motors
How do you correctly FPV attach props to motors?
You attach FPV props by matching each prop’s rotation direction to the motor direction.
Every FPV drone uses either CW (clockwise) or CCW (counter-clockwise) rotation. If you install a prop on a motor spinning the wrong way, your quad will flip instantly on takeoff. Always check:
- Motor direction in Betaflight
- Arrow or label on the prop
- Prop orientation (leading edge faces the direction of rotation)
This is the most critical step when you fpv attach props to motors.
Why is drone prop direction so important?
Because wrong drone prop direction causes immediate loss of lift and control.
Drone props are airfoils—only one side produces lift in the intended direction. If even one prop is backwards, your drone may:
- Flip on arm
- Drift uncontrollably
- Overheat motors and ESCs
Correct drone prop direction ensures stable lift, proper yaw control, and efficient thrust.
How do I know my FPV drone motor direction is correct?
You verify FPV drone motor direction inside Betaflight using the Motors tab.
Remove your props, connect USB, and spin each motor manually in Betaflight:
- Motor 1 & 2 usually spin inward
- Motor 3 & 4 spin the opposite direction
If any motor spins wrong, fix it by: - Reversing in BLHeli
- Or swapping any two motor wires on the ESC
Never rely on visual guesswork—always confirm fpv drone motor direction electronically.
What happens if I attach FPV props backwards?
Your drone will flip instantly or fail to take off.
Backwards props create downward airflow instead of lift. Common signs include:
- Violent flip on arming
- Extreme vibration
- Motors getting hot within seconds
This is one of the most common beginner mistakes when learning to fpv attach props to motors.
Do CW and CCW props really matter on FPV drones?
Yes—CW and CCW props matter for torque balance and yaw stability.
Using the wrong mix causes:
- Poor yaw authority
- Unstable throttle response
- Extra mechanical stress on motors
Modern FPV quads rely on opposing drone prop direction to cancel torque forces properly.
Should I install props before or after setting motor direction?
Always set motor direction first—install props last.
This prevents:
- Accidental injury
- Prop wash during testing
- ESC or motor damage
The correct workflow is:
- Set fpv drone motor direction
- Confirm in Betaflight
- Then fpv attach props to motors
If you’re experimenting with different props or dialing in a new motor setup, you can join the MEPSKING VINE VOICE program for a chance to try FPV motors, props, and other gear at no cost. Just apply, test the parts, and share your honest experience with the community.
