
One of the most frustrating problems FPV pilots face is when the drone refuses to take off. Whether you are a beginner or an experienced pilot, take-off issues can stop your flight before it even begins.
This guide will walk you through the most common causes of FPV drones not taking off, how to diagnose the problem step by step, and the solutions you can apply to get your quad back in the air.
👉 Explore the FPV drone parts to build your own FPV drone.
Common Causes of FPV Drone Take-off Issues
There are multiple possible reasons behind take-off issues. We can categorize them into five main groups:
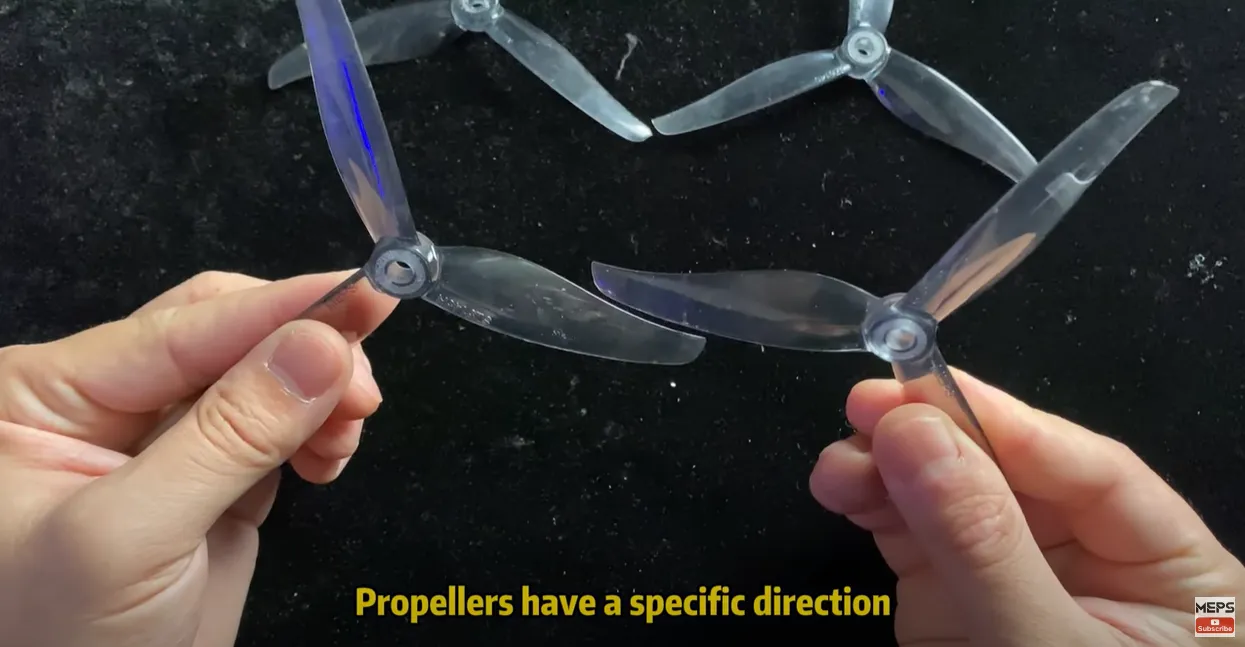
Propeller & Motor Errors
- Props installed incorrectly
- Motors spinning in the wrong direction
- Loose or stripped prop nuts
- Damaged motors or bent shafts
Battery & Power Supply Problems
- Low-voltage or weak batteries
- Poor-quality LiPo with insufficient C-rating
- Loose or burnt XT60 connectors
- Power distribution board or ESC wiring faults
Flight Controller & ESC Misconfigurations
- Incorrect FC orientation or board alignment
- ESCs not calibrated properly
- Wrong motor mapping in Betaflight/INAV
- Arming disable flags preventing take-off
Receiver & Radio Transmitter Issues
- Receiver not bound to transmitter
- Throttle endpoints not matching
- Wrong channel mapping
- Failsafe activated due to poor signal
Mechanical & Environmental Factors
- Frame damage (bent arms, loose screws)
- Weight distribution imbalance
- Flying indoors without enough GPS lock (for GPS quads)
- Extreme weather: wind, rain, or very high temperatures

Quick Diagnostic Table
SAFETY FIRST: Always remove your propellers before connecting your drone to Betaflight or testing motors. A runaway drone indoors can cause serious injury or damage.
If you are in a hurry, check this quick fix list. Click the links to jump to the detailed guide.
| Symptom | Most Likely Cause | Quick Fix |
|---|---|---|
| Flips over immediately | Wrong Motor/Prop direction | Check Step 2 & 3 |
| Motors spin, no lift | Props installed upside down | Check Step 3 |
| Won’t Arm (No response) | Arming Disabled Flags | Check “Status” in CLI |
| Drifts aggressively | Accelerometer not calibrated | Calibrate in Setup Tab |
Pro Tip: Checking Arming Flags
If your drone won’t arm (the motors don’t spin when you flick the switch), connect to Betaflight, go to the CLI tab, type status, and press Enter. Look for the Arming disable flags.
- THROTTLE: Your throttle stick is not at the bottom.
- ANGLE: The drone is tilted too much (default is 25°).
- MSP: The drone is still connected to the computer.
- CALIB: The sensor is still calibrating.
How to solve FPV Drone Take Off issue? Step-by-Step Troubleshooting Guide
When your drone won’t take off, don’t panic. Follow this systematic checklist:
Workflow: Power System → Control System → Sensors & Flight Controller → Hardware Inspection
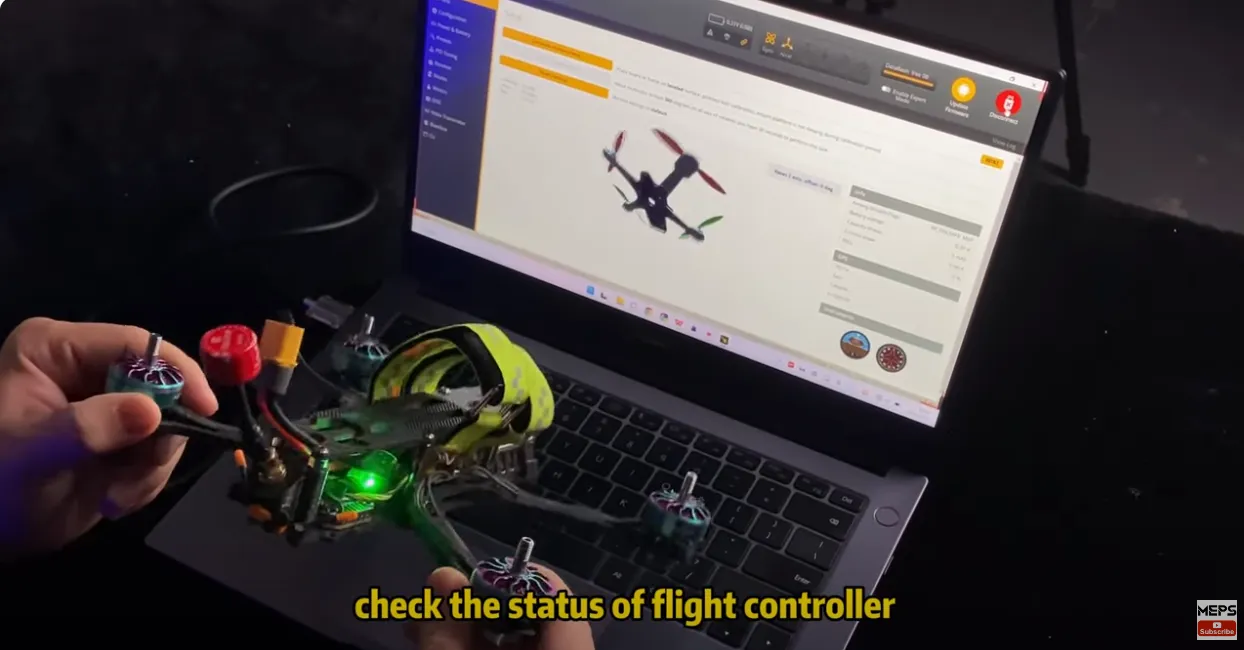
Step 1: Flight Controller Setup in Betaflight
Firstly, ensure your propellers are removed for safety, then connect your drone to Betaflight to inspect the flight controller’s status.

Secondly, check the flight controller orientation:
- Go to the Setup tab and compare the on-screen horizon with your quadcopter.
- If it doesn’t match, your flight controller may be mounted incorrectly.
- Cinewhoops and mini quads often have inverted setups.
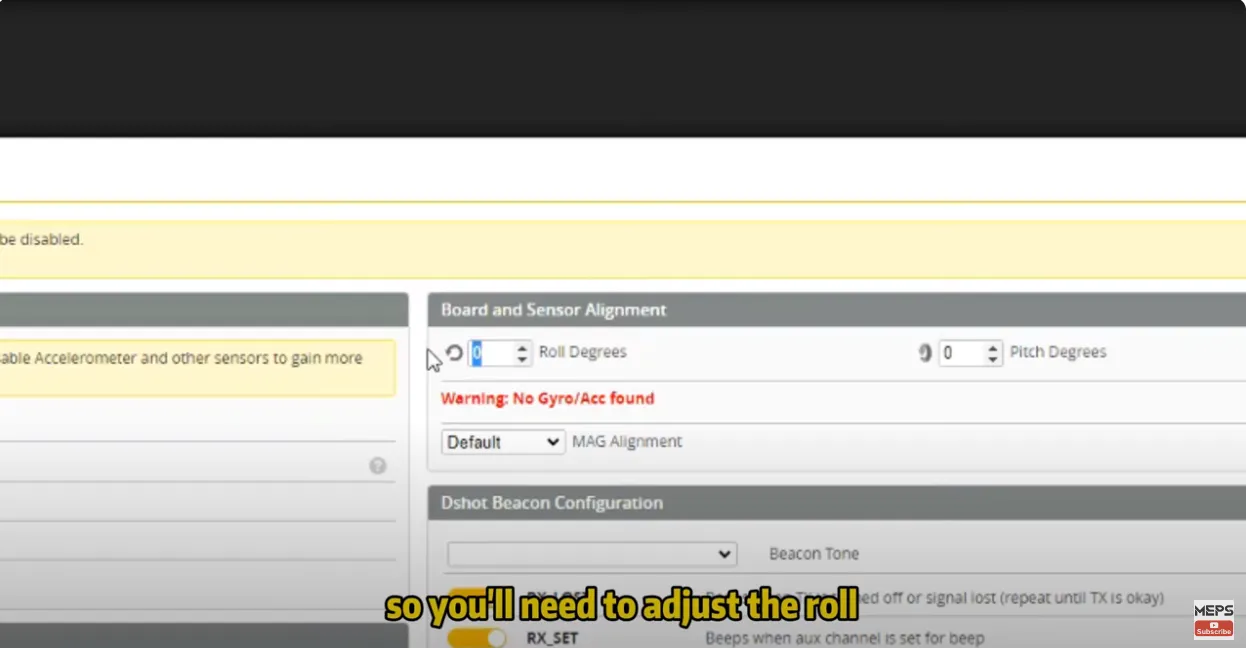
Thirdly, Adjust Orientation Settings:
In Betaflight, adjust the roll by 180 degrees if your setup is inverted. Don’t forget to check and match the yaw and pitch settings according to your flight controller’s installation. Continue tweaking until the quadcopter’s status on Betaflight aligns with its physical orientation.
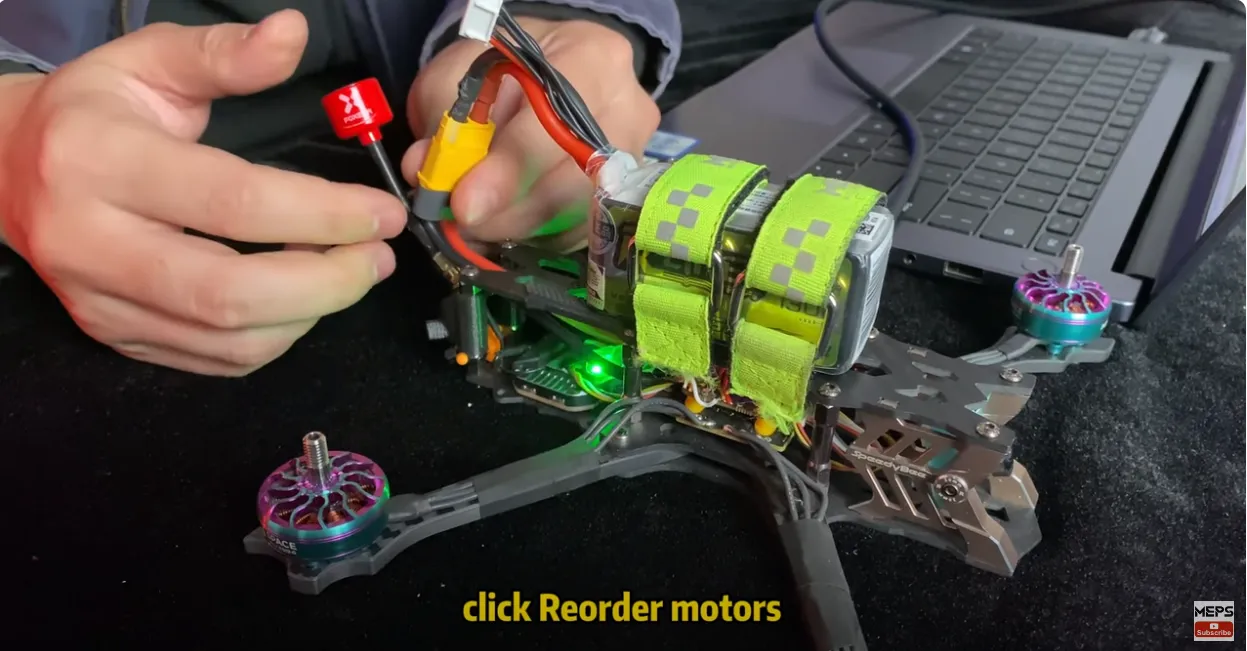
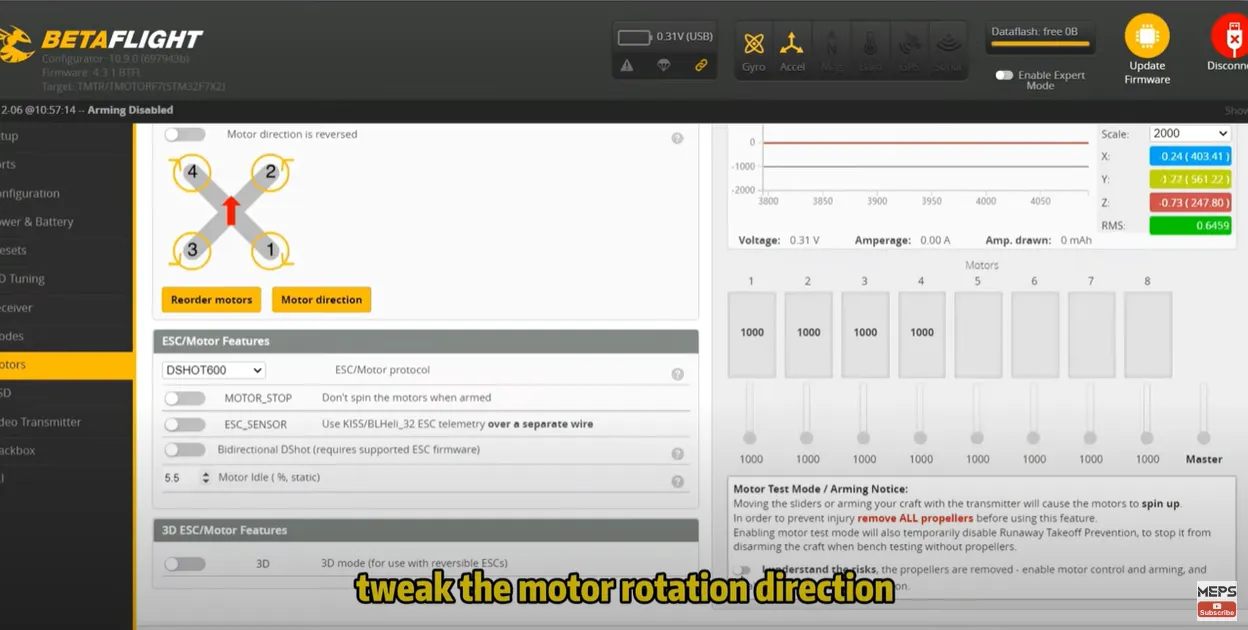
Step 2: Motor Configuration
- Next, navigate to the motors interface in Betaflight. This step is crucial for ensuring your motors spin correctly and in the right sequence.
- Reorder Motors: With the FPV powered up, select “Reorder motors” in Betaflight and follow the on-screen instructions to correct the motor sequence.
- Adjust Motor Rotation: Initiate a low-speed spin by clicking on “I understand the risks and start.” Gently touch each motor to verify if the rotation direction matches the indicated markers. If a motor spins incorrectly, a simple click can reverse its direction.
Step 3: Correct Propeller Installation
- A common oversight among beginners is mounting the propellers incorrectly. Propellers are designed to rotate either clockwise or counterclockwise, and matching their direction with the motor’s rotation is essential.
- Install Propellers Properly: Ensure the side of the propeller with writing faces upwards. This guideline also applies to quadcopters utilizing reverse motor thrust. Correct propeller orientation is critical for successful takeoff.
Step 4: Check Battery & Power
- Measure the voltage with a multimeter. A fully charged 4S battery should read around 16.8V.
- If the battery sags immediately on throttle, replace it with a higher C-rated pack.
- Inspect connectors for heat damage, blackening, or loose solder.
Step 5: Confirm Radio & Receiver Setup
- Ensure receiver is bound to the transmitter.
- Check channel mapping (roll, pitch, yaw, throttle) in Betaflight.
- Verify failsafe settings—incorrect failsafe may prevent arming.
- Adjust throttle endpoints in your transmitter to match the FC range.
Step 6: Look for Hardware Damage
- Inspect arms, motors, and propellers for visible cracks or bends.
- Check for loose wires or broken solder joints.
- If the drone is very heavy (camera + payload), ensure motors and props are powerful enough to provide lift.
Troubleshooting Table (Quick Reference)
| Problem | Diagnosis | Solution |
|---|---|---|
| Propellers upside down | Visual inspection | Reinstall props with text facing up |
| Wrong motor direction | Betaflight motor test | Reverse in BLHeli or swap wires |
| Weak battery | Voltage test, flight time | Use fully charged or higher C-rated pack |
| ESCs not calibrated | Motor desync symptoms | Perform ESC calibration |
| FC orientation incorrect | Check arrow direction | Remount or adjust in Betaflight |
| Receiver not binding | RX LED not solid | Re-bind with transmitter |
| Drone not arming | CLI “status” flags | Fix throttle min, calibrate accelerometer |
| Frame/motor damage | Physical inspection | Replace damaged parts |
Prevention Tips
- Always run a pre-flight checklist before arming.
- Mark props CW/CCW for easy identification.
- Use high-quality LiPo batteries with enough discharge rating.
- Keep firmware updated, but stick to stable releases.
- Regularly inspect solder joints and connectors.
- Store batteries properly to extend lifespan.
FAQ about FPV drone take-off issue
Q1: Why does my FPV drone flip over as soon as I push the throttle?
A: This is the “Flip of Death.” It happens if your Flight Controller orientation is wrong, motors are in the wrong order, or props are spinning the wrong way. Double-check Step 1 and Step 2 carefully.
Q2: My motors are spinning fast, but the drone stays on the ground. Why?
A: Usually, your propellers are upside down (text should face up) or you have “Props Out” configured in Betaflight while using a “Props In” physical setup.
Q3: How do I know if my motor direction is correct?
A: Use a small piece of paper or very lightly touch the side of the motor bell with your finger in the Betaflight Motor Tab. Compare the spin direction with the diagram on the screen.
Q4: Should I calibrate my ESCs for a new build?
A: If you are using DShot (the most common protocol in 2026), you do not need to calibrate ESCs. For older protocols like OneShot or MultiShot, calibration is mandatory.
Q5: Can heavy payloads stop drones from taking off?
Yes. If the thrust-to-weight ratio is too low, your drone will struggle or fail to lift.
Conclusion
By carefully following these three steps, you stand a good chance of resolving takeoff issues. However, if your FPV drone still refuses to ascend, the last line might suggest a bit of humor in troubleshooting frustrations. But remember, persistence and careful attention to detail often lead to the best solutions in FPV flying.