
A 5-inch FPV racing drone is still one of the best formats for raw speed, sharp cornering, and easy parts support. If you want a quad that feels locked-in on the track, repairs quickly between packs, and gives you full control over weight, power, and tuning, building it yourself is still the best option.
This guide focuses specifically on how to build a 5-inch FPV racing drone, not a general freestyle quad. That means the parts, setup choices, and tuning priorities here are all biased toward racing performance: low weight, fast throttle response, predictable cornering, clean wiring, and easy field repair.
If you are looking for a true DIY 5-inch FPV racing drone build, this is the setup path I would recommend from a real FPV pilot’s perspective.
Who Is This Guide For?
– Beginners wanting to build their first FPV racing drone
– DIY tinkerers looking for a satisfying personal project
– FPV racers who want a lightweight, high-speed drone optimized for racing
– Builders searching for a practical 5-inch FPV drone build list
Why Build a FPV Racing Drone Instead of Buying One?
DIY FPV racing drone kits not only save money but help you truly understand your aircraft. You’ll know exactly how to troubleshoot, upgrade, or repair it. Most importantly, building a racing drone from scratch gives you a serious edge in performance tuning, weight reduction, and custom configuration.
👉 Explore the FPV drone parts to build your own FPV drone.
This video tutorial covers the full build and tuning process of this 5 inch FPV racing drone.
5 Inch FPV Racing Drone Parts List
This 5-inch FPV racing drone parts list is chosen with racing priorities in mind, not cinematic flying or long-range cruising.
For racing, I care most about:
- low and balanced weight
- fast motor response
- reliable 6S power delivery
- strong but simple frame design
- low-latency camera performance
- clean VTX and receiver installation
- easy field repair after crashes
Here’s the complete FPV racing drone parts list for a 5-inch build, chosen for performance and durability.
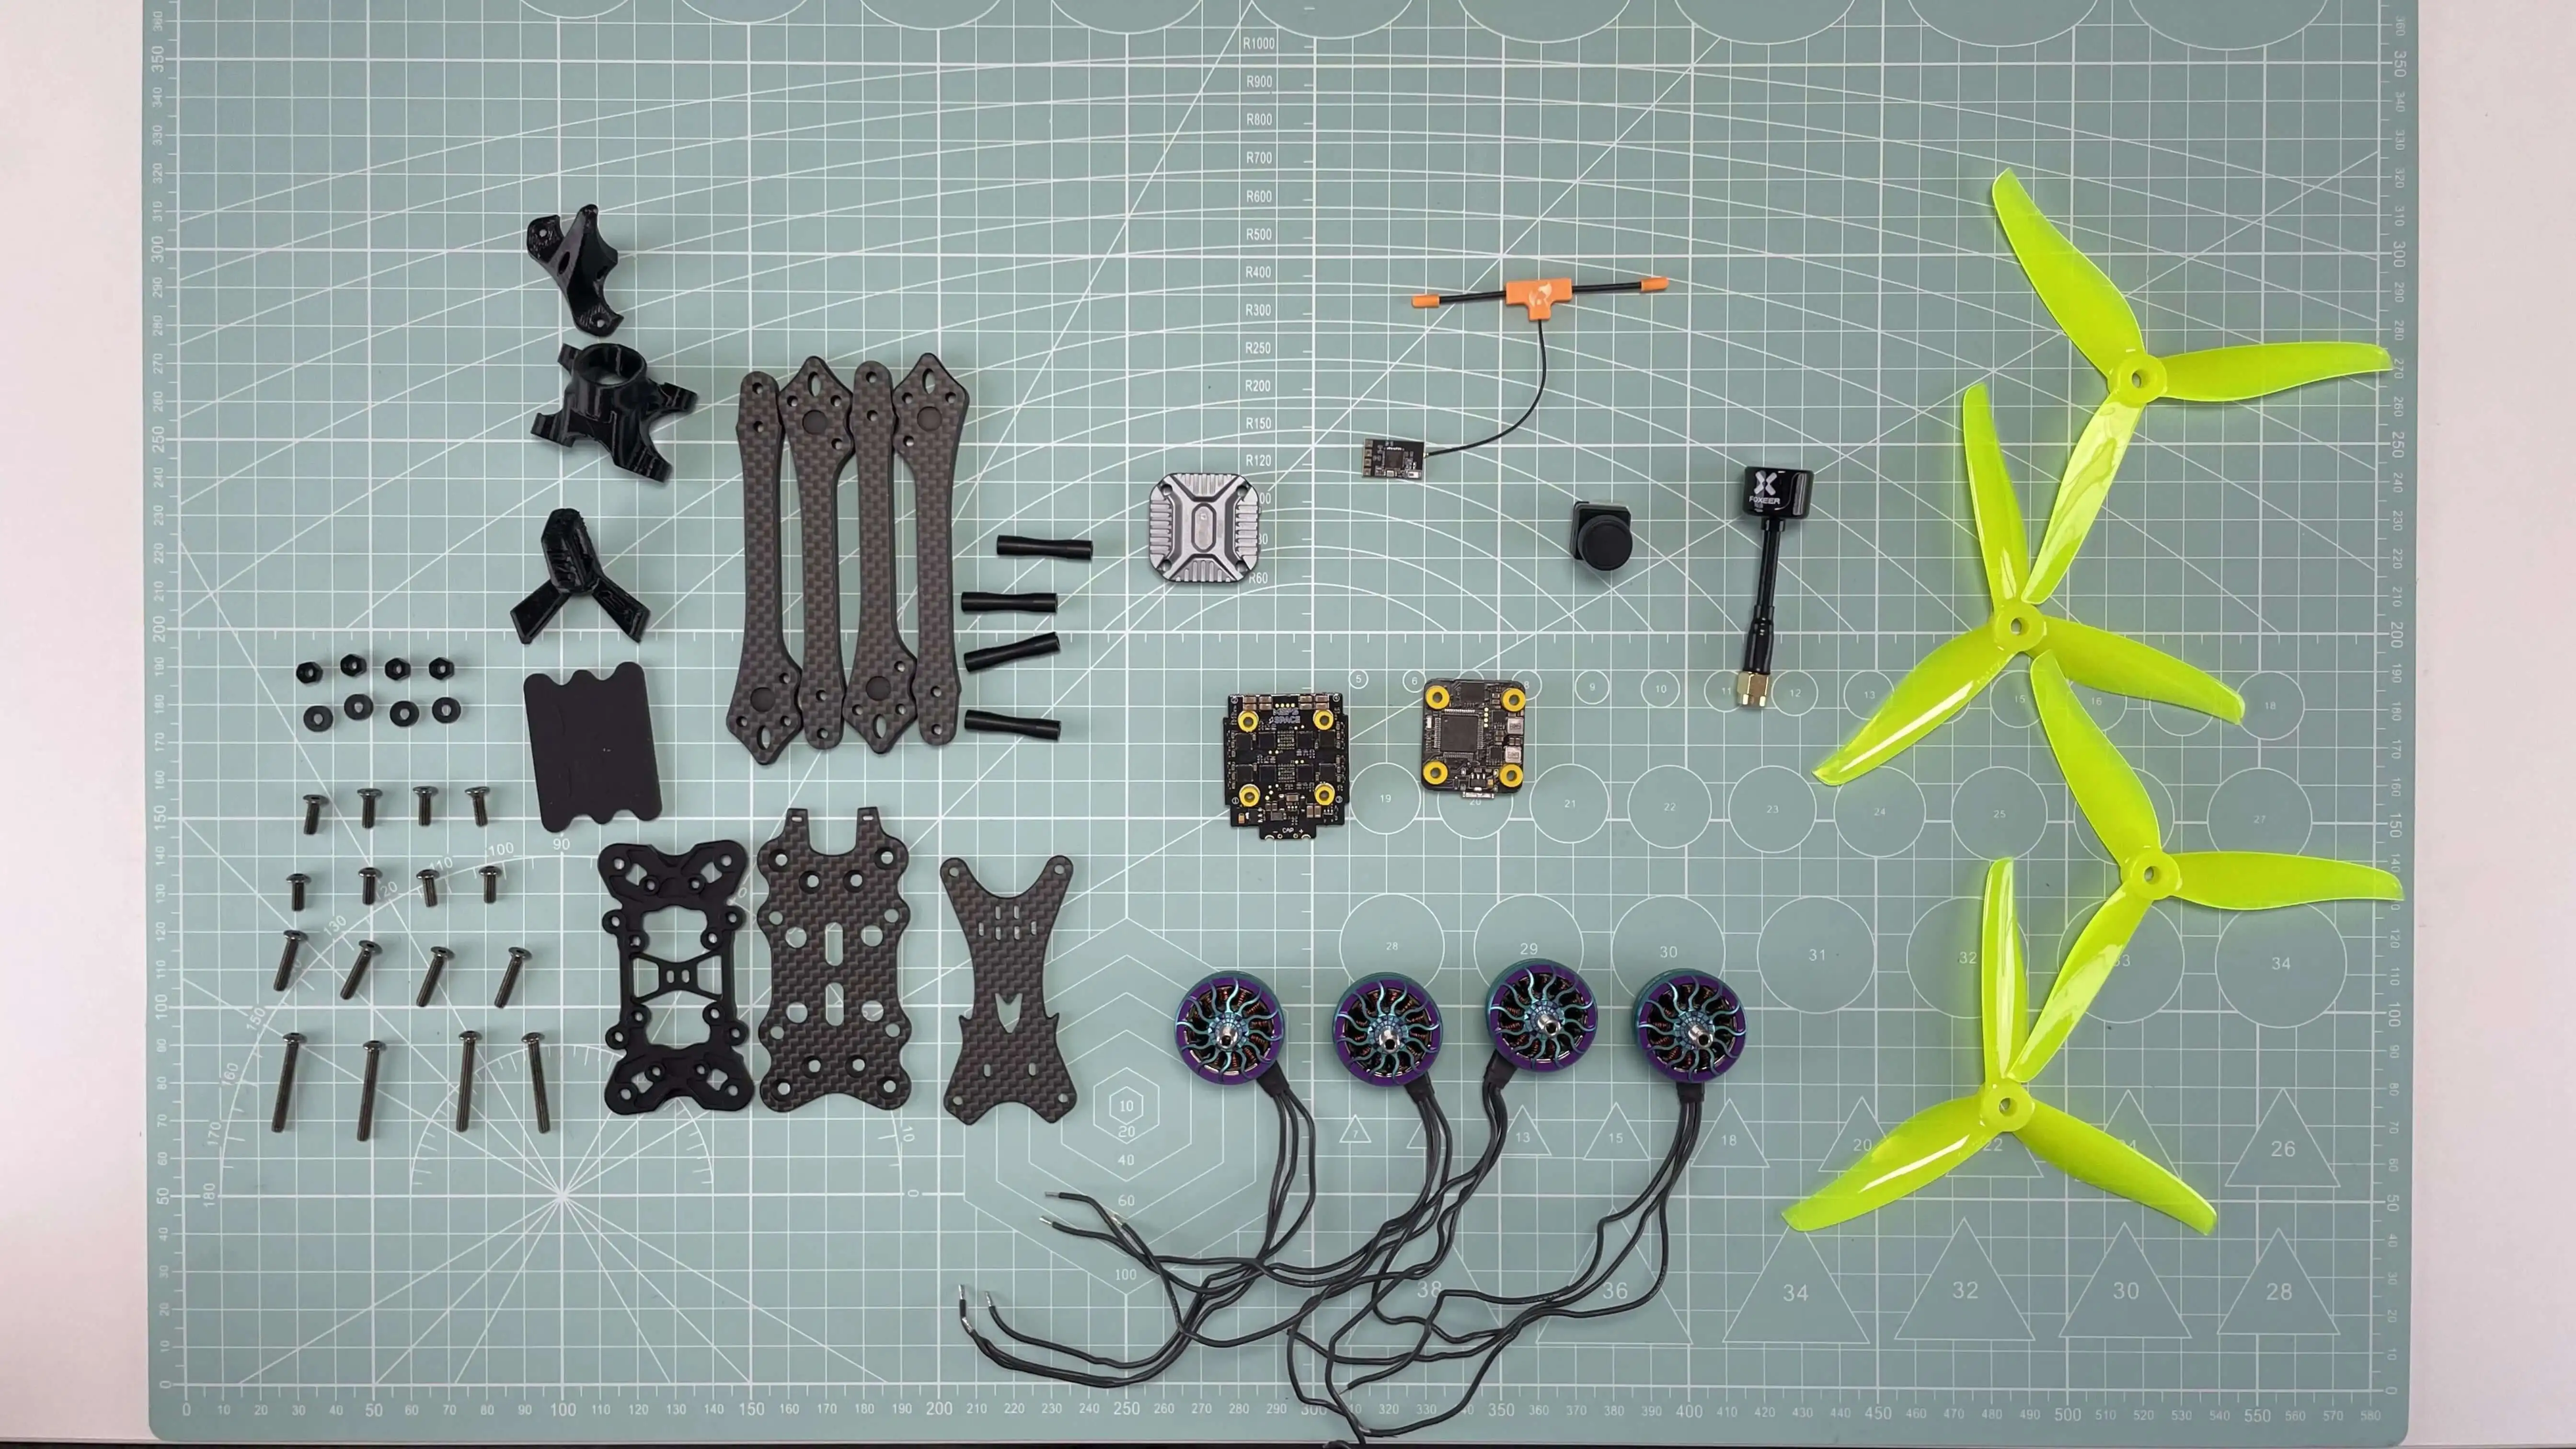
| Part | Model | Why We Chose It |
| Frame | BCROW PRO-V4 | Lightweight, true-X design, thick carbon fiber arms—perfect for high-speed turns and crash resistance. Optimized for 5” racing builds. |
| Motors | MEPS SZ 2207 1950KV | Ideal stator size for racing. High KV = faster response. Ribbed 1.37mm design resists impact and vibration. Lightweight yet durable. |
| ESC | MEPS SZ 45A MINI ESC (32-bit) | Supports 6S and high amp draw. 32-bit processing ensures ultra-smooth throttle response and DShot compatibility. |
| Flight Controller | MEPS SZ F7 MINI (F722 chip) | High computing power, great for racing filtering (RPM + DShot600). Plenty of UARTs and blackbox storage. |
| Props | MEPS SZ5145 Propeller | Designed for racing—efficient thrust, durability, aggressive pitch for acceleration and top-end speed. |
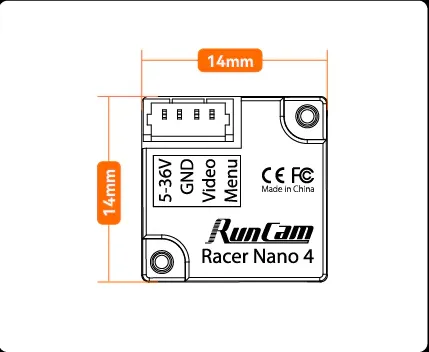
| Camera | RunCam Racer Nano 4 | Low latency, wide dynamic range, perfect for high-speed visibility. Compact and crash-resistant. |
| VTX | T-Motor FT800 | 25mW–800mW power switch, race-legal with SmartAudio support. Clean signal with strong penetration. |
| Receiver | BETAFPV ELRS 2.4G Nano | Lightweight, long-range, and ultra-low latency. Fully compatible with ExpressLRS protocol radios. |
| Antenna | Foxeer Lollipop 4 | Compact, durable, with excellent 5.8GHz signal. 2.6dBi gain ideal for track performance. |
| Battery | 6S 1300mAh LiPo | Balanced weight and capacity—powerful punch, but keeps AUW within race-legal limits. |
This FPV racing drone parts list is optimized for 5-inch racing drones and represents one of the best combinations for both beginner FPV racing drone kits and advanced builds.
If you’re planning to build a new racing drone and need motors, stacks, props, or batteries, you can join the MEPSKING Vine Voice. You might get a chance to receive these parts for free, and you can also share your experiences and suggestions to help improve future products.

Essential Tools
You’ll need these to build:
| Tool | Purpose |
| 60W Adjustable Soldering Iron | For clean, reliable joints |
| Rosin-core Solder Wire | Better conductivity |
| Hex Driver Set (1.5mm, 2.0mm, 2.5mm) | For frame and motor screws |
| Wire Strippers & Tweezers | For prep work |
| Heat Shrink Tubes & Zip Ties | For insulation and cable management |
| Multimeter | To test continuity and avoid shorts |
| Thermal Paste | Optional, for ESC/VTX cooling |
Step-by-Step: How to Build a DIY FPV Racing Drone
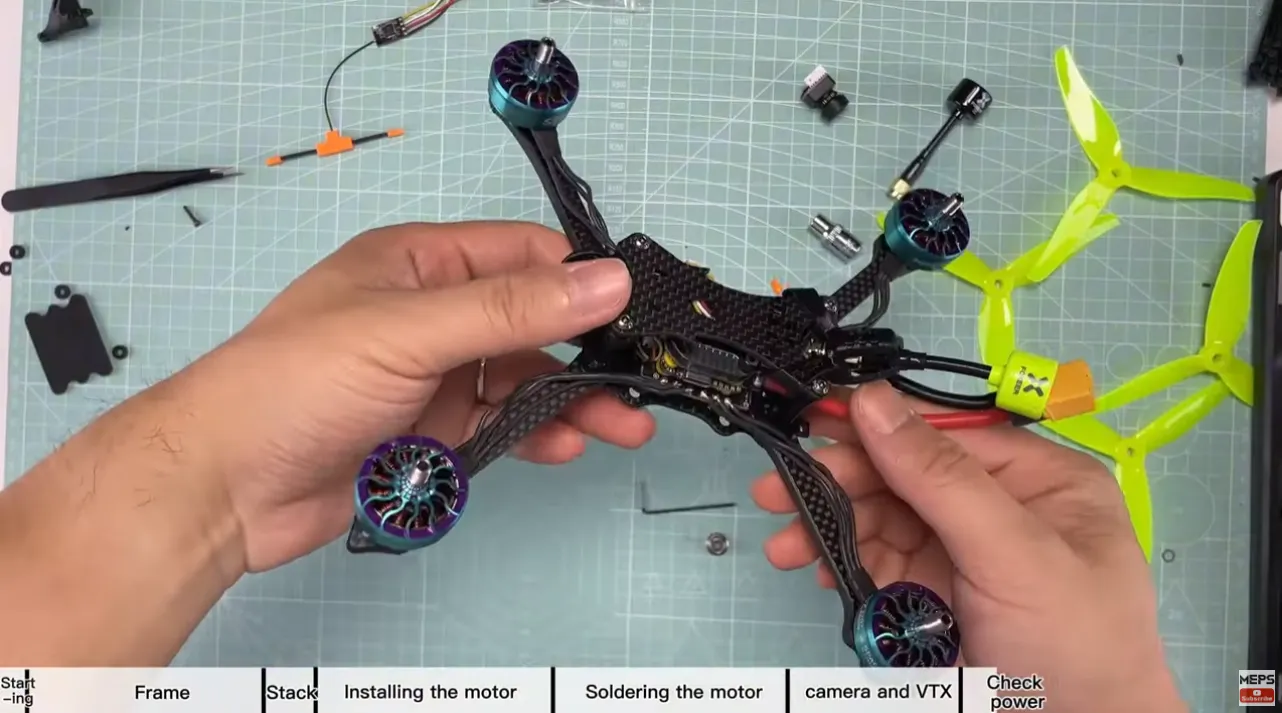
Step 1. Assemble the Frame
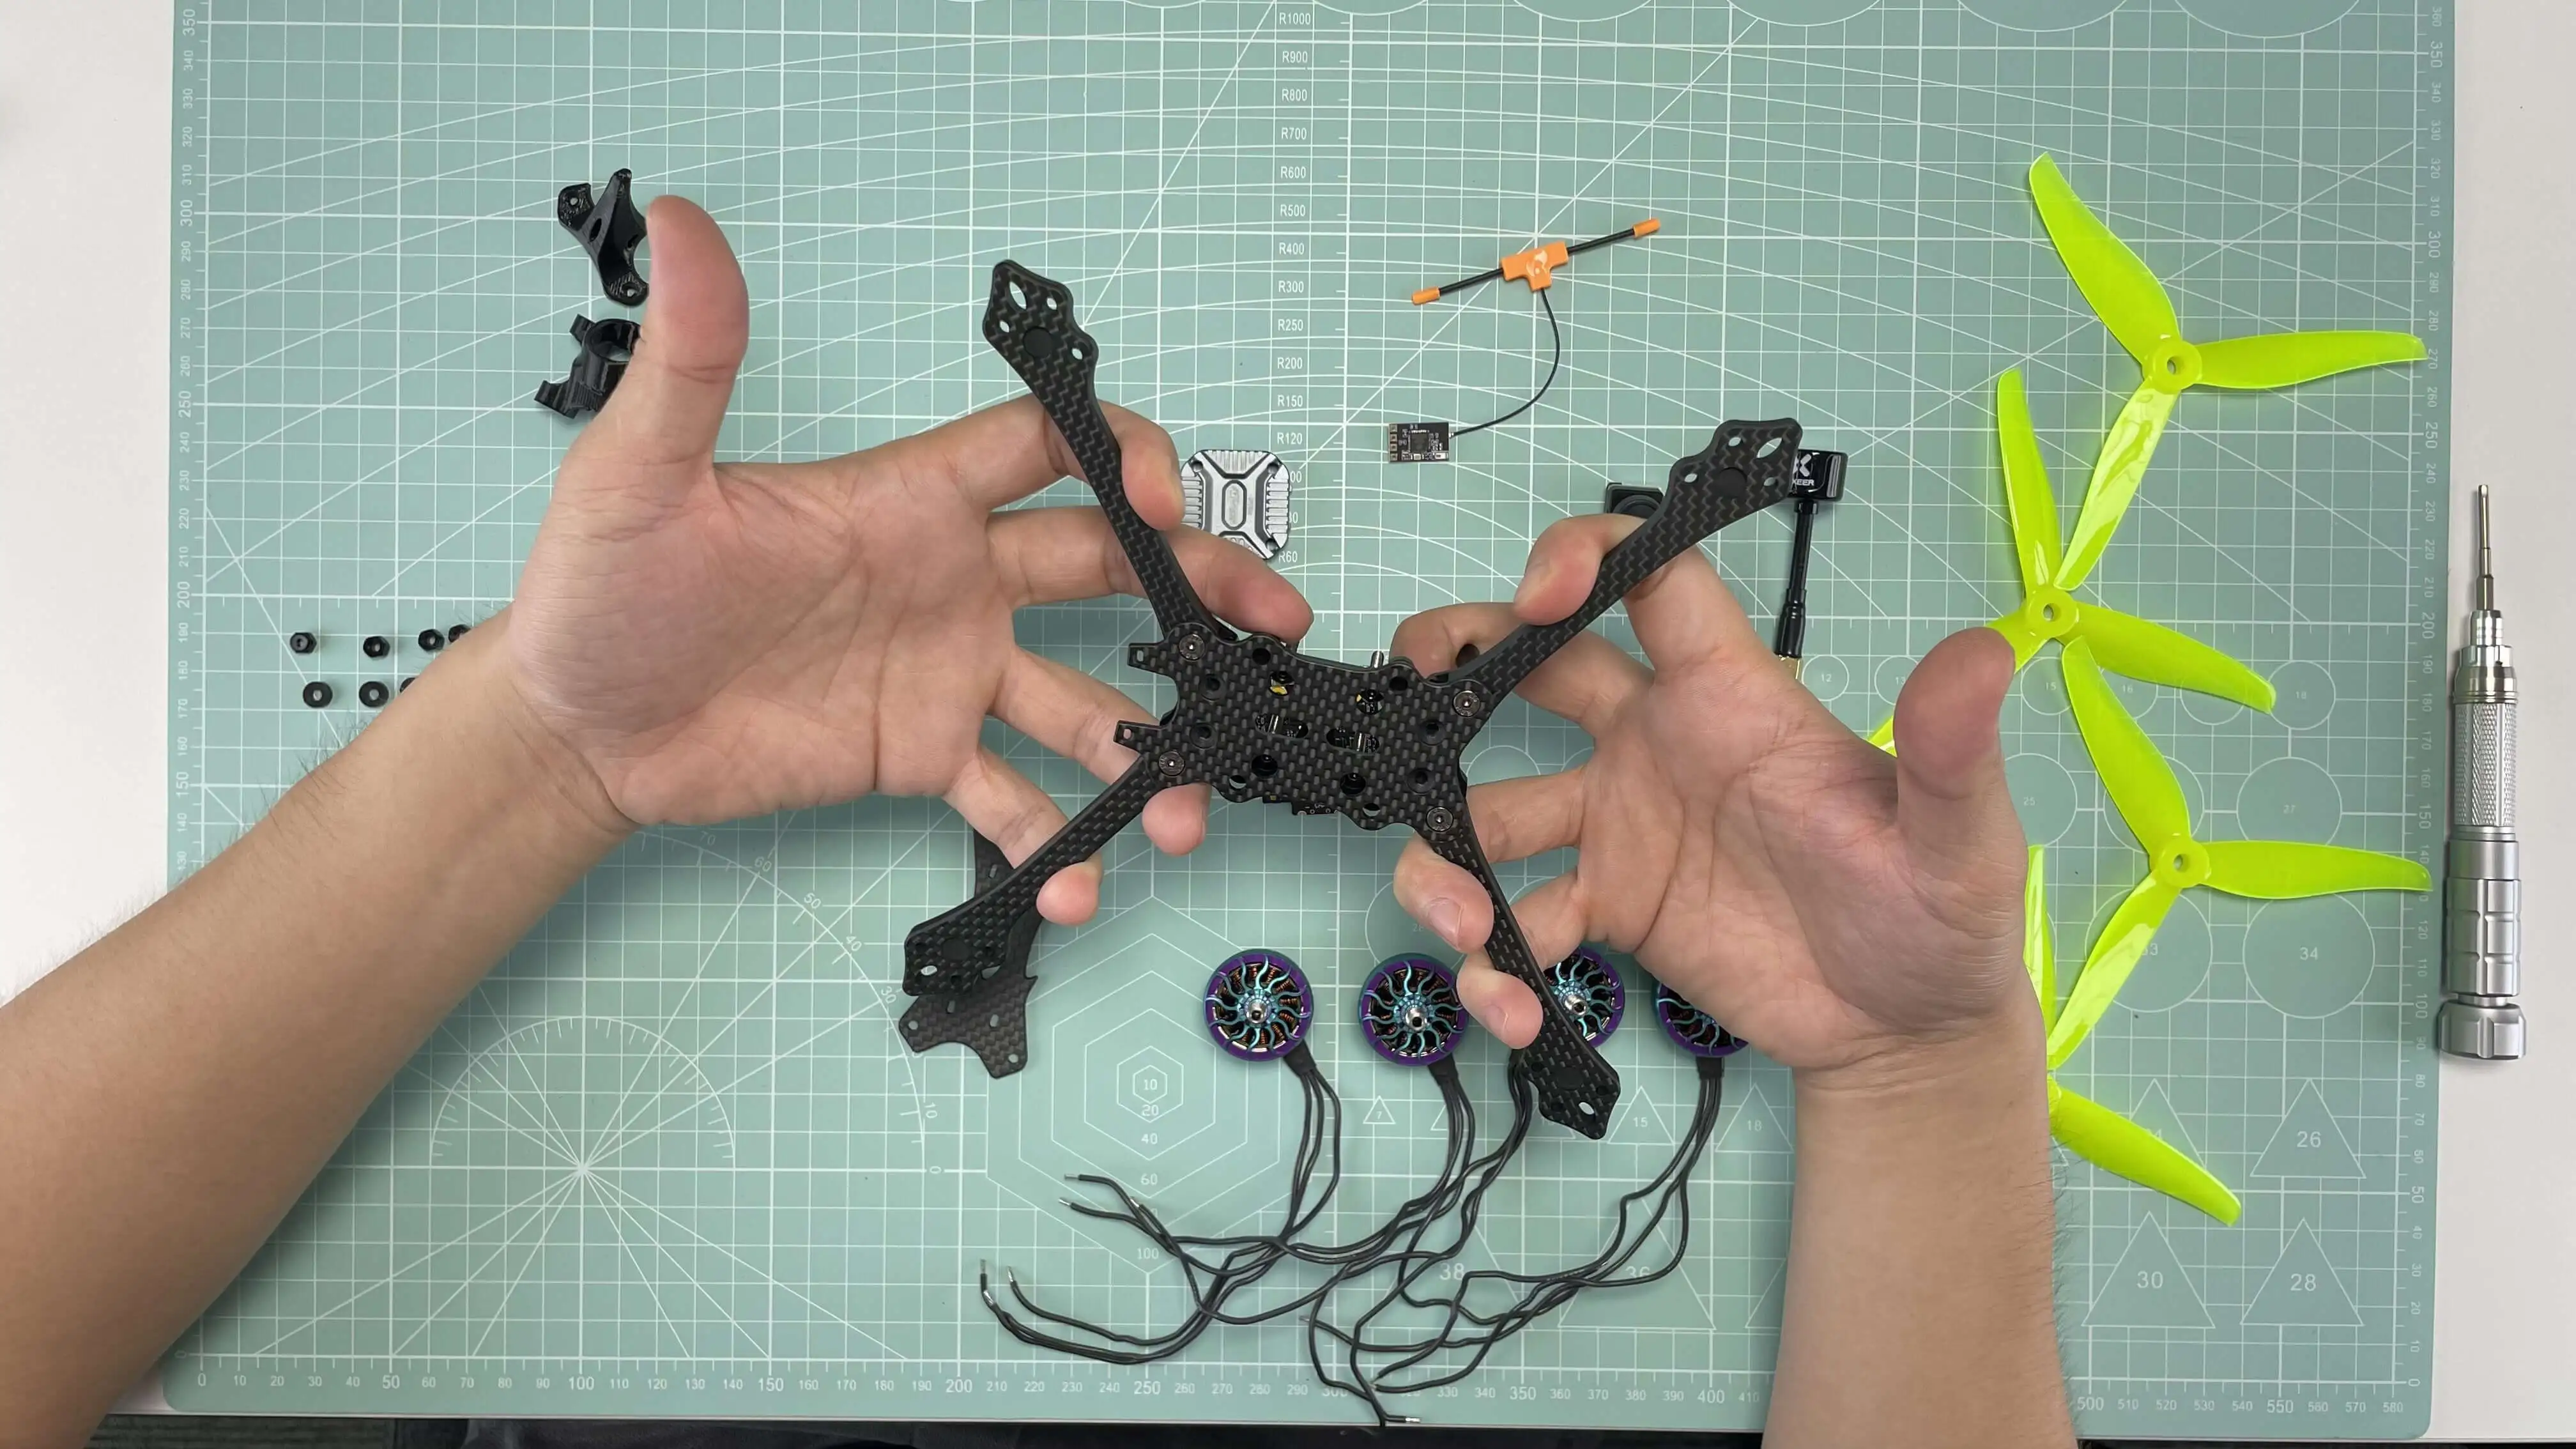
- Lay out the carbon fiber bottom plate, arms, and side plates.
- Assemble with M3 hardware—tighten gradually and evenly.
- Check flatness by placing the frame on a flat table. Uneven frames cause vibrations.
Pro Tip: Apply Loctite to screws for vibration resistance during crashes.
For a racing build, keep the frame as simple and serviceable as possible. Fancy TPU parts, oversized mounts, and unnecessary accessories all add weight. A racing quad should be easy to open, quick to repair, and light enough to change direction aggressively.
Step 2. ESC + XT60 + Capacitor Soldering
a. XT60 Power Lead
- Use 14AWG silicone wires. Red = + / Black = −.
- Solder to ESC battery pads. Use a high-temp (450°C) soldering iron tip.
b. Capacitor Installation
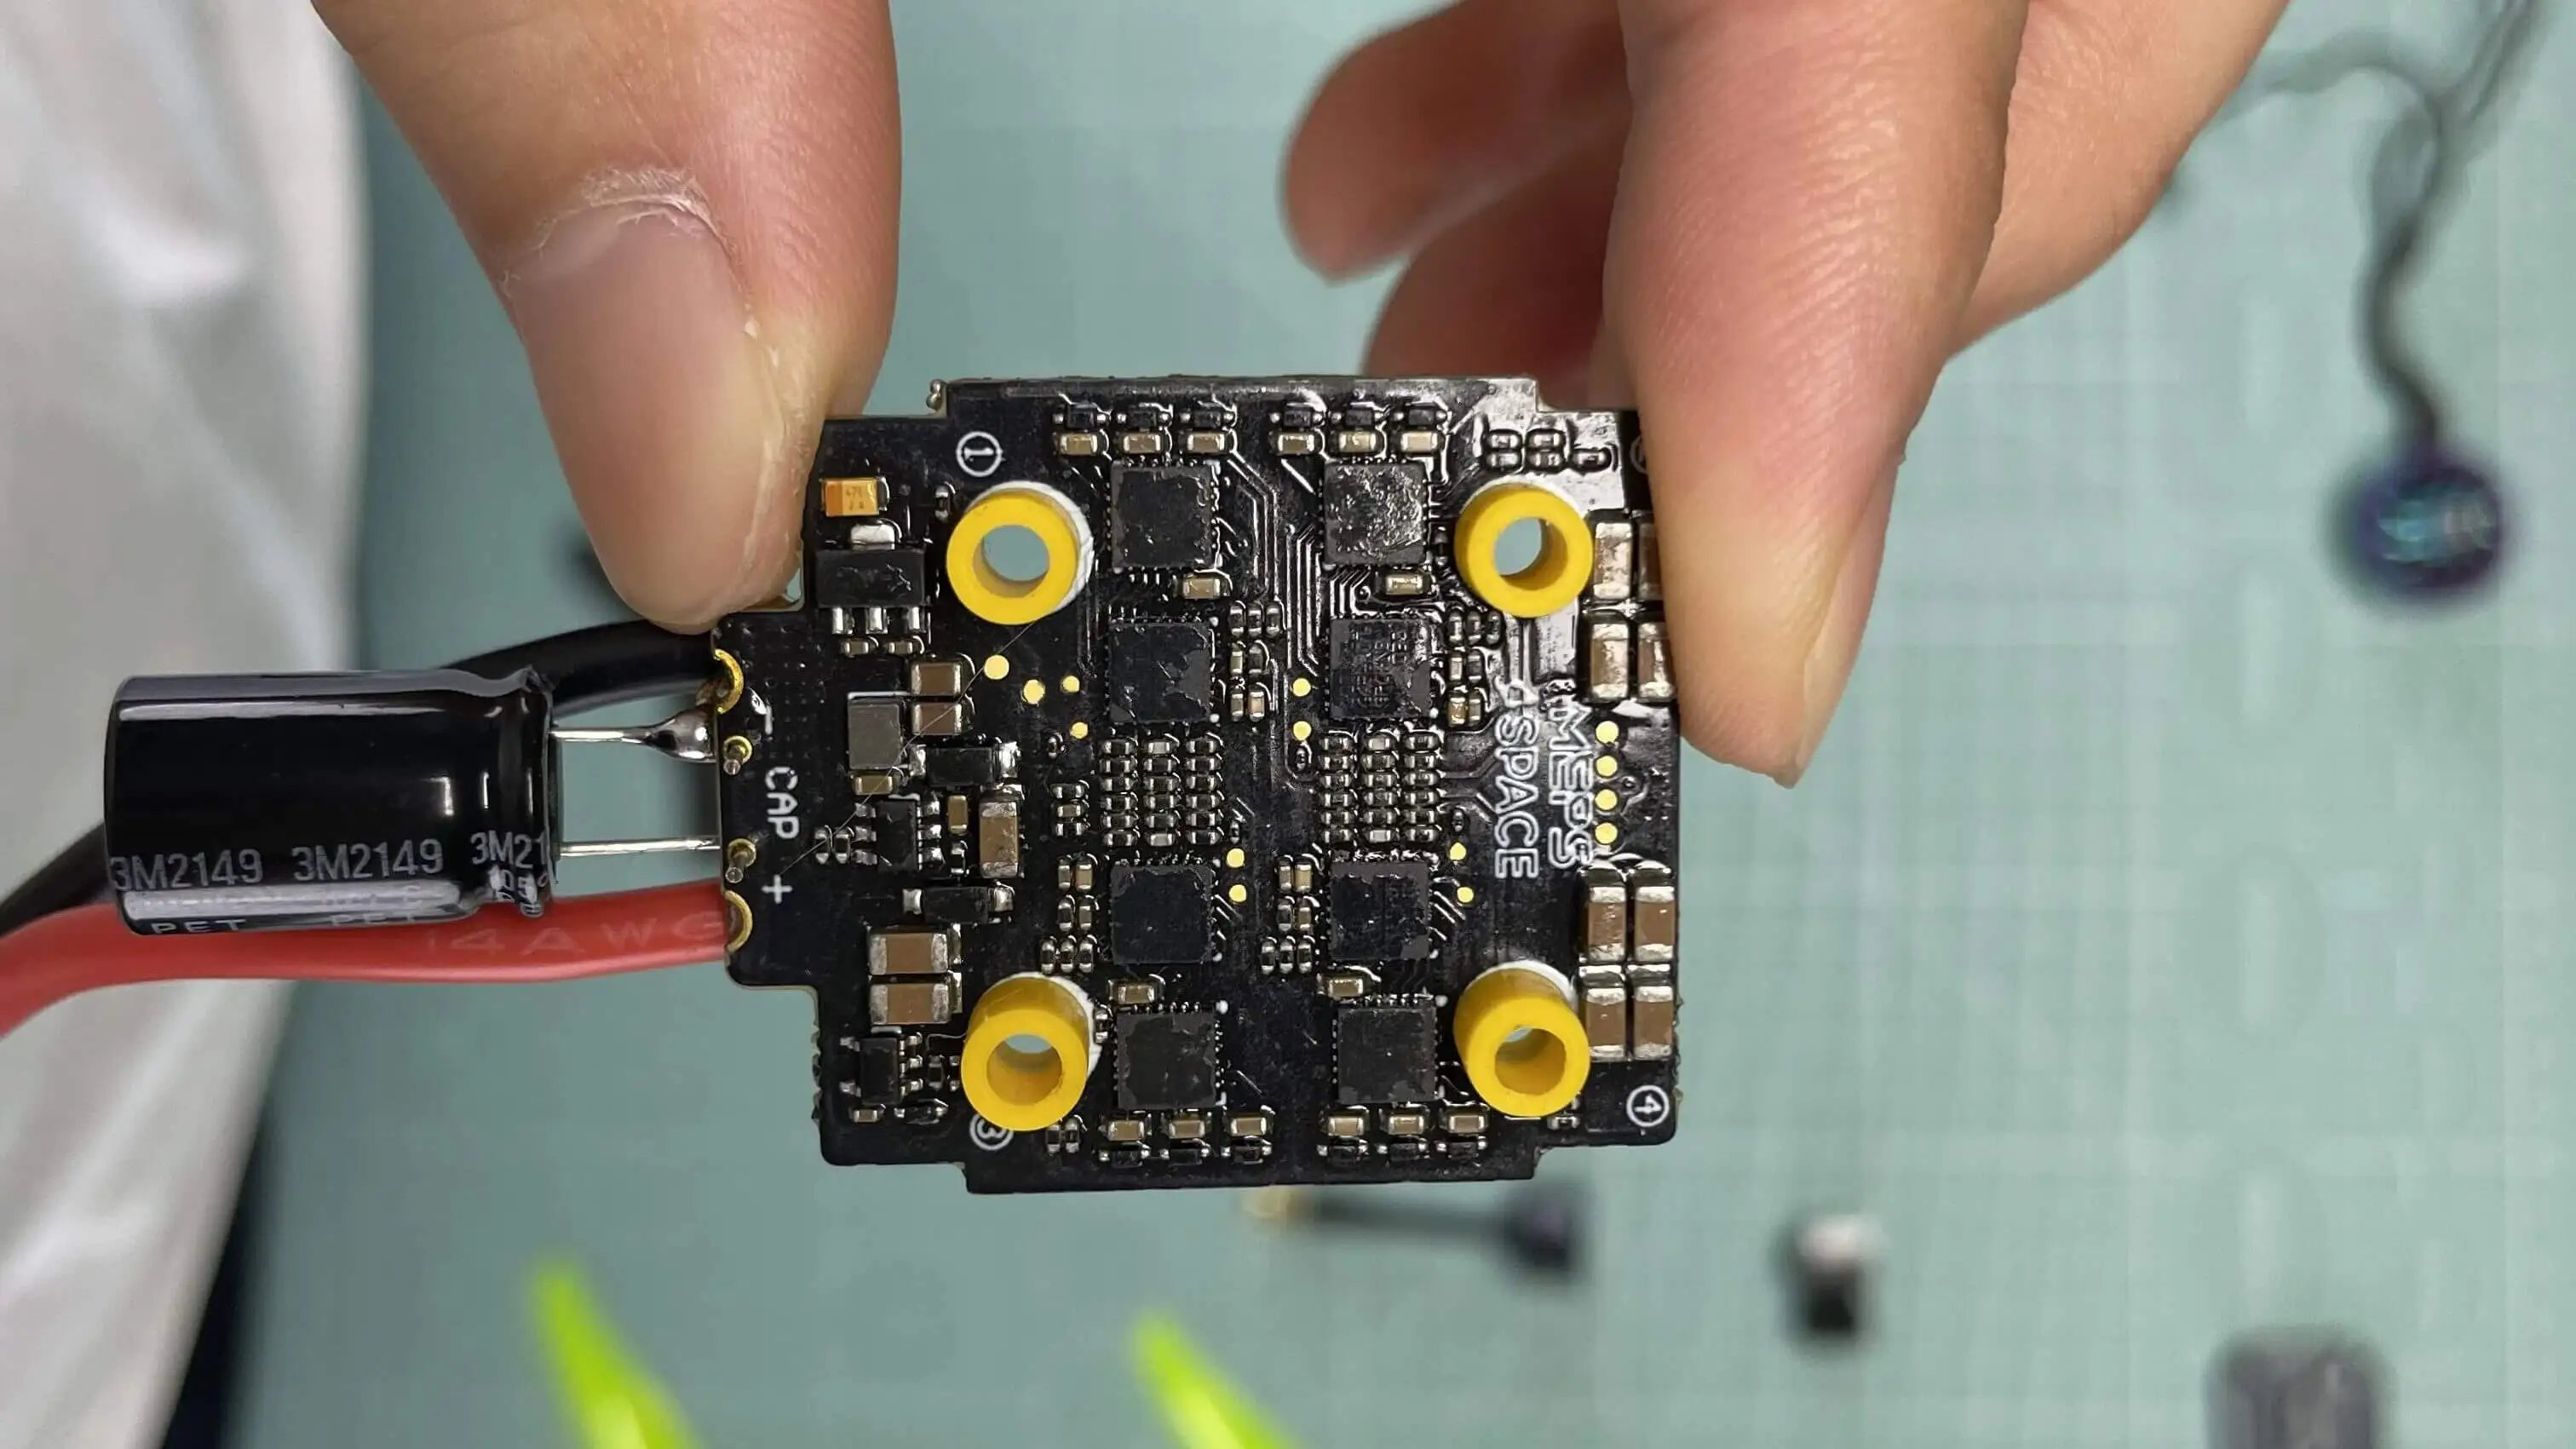
For a 5-inch 6S racing build, I strongly recommend a low-ESR 1000uF capacitor.
Solder it directly across the ESC battery pads:
- positive leg to positive
- negative leg to negative
- keep the leads short
- Protect the capacitor with heat shrink tubing. Mount close to ESC input.
- secure it so it cannot hit the carbon frame
Why this matters: Capacitors suppress voltage spikes and protect your ESC & FC from brownouts or damage.
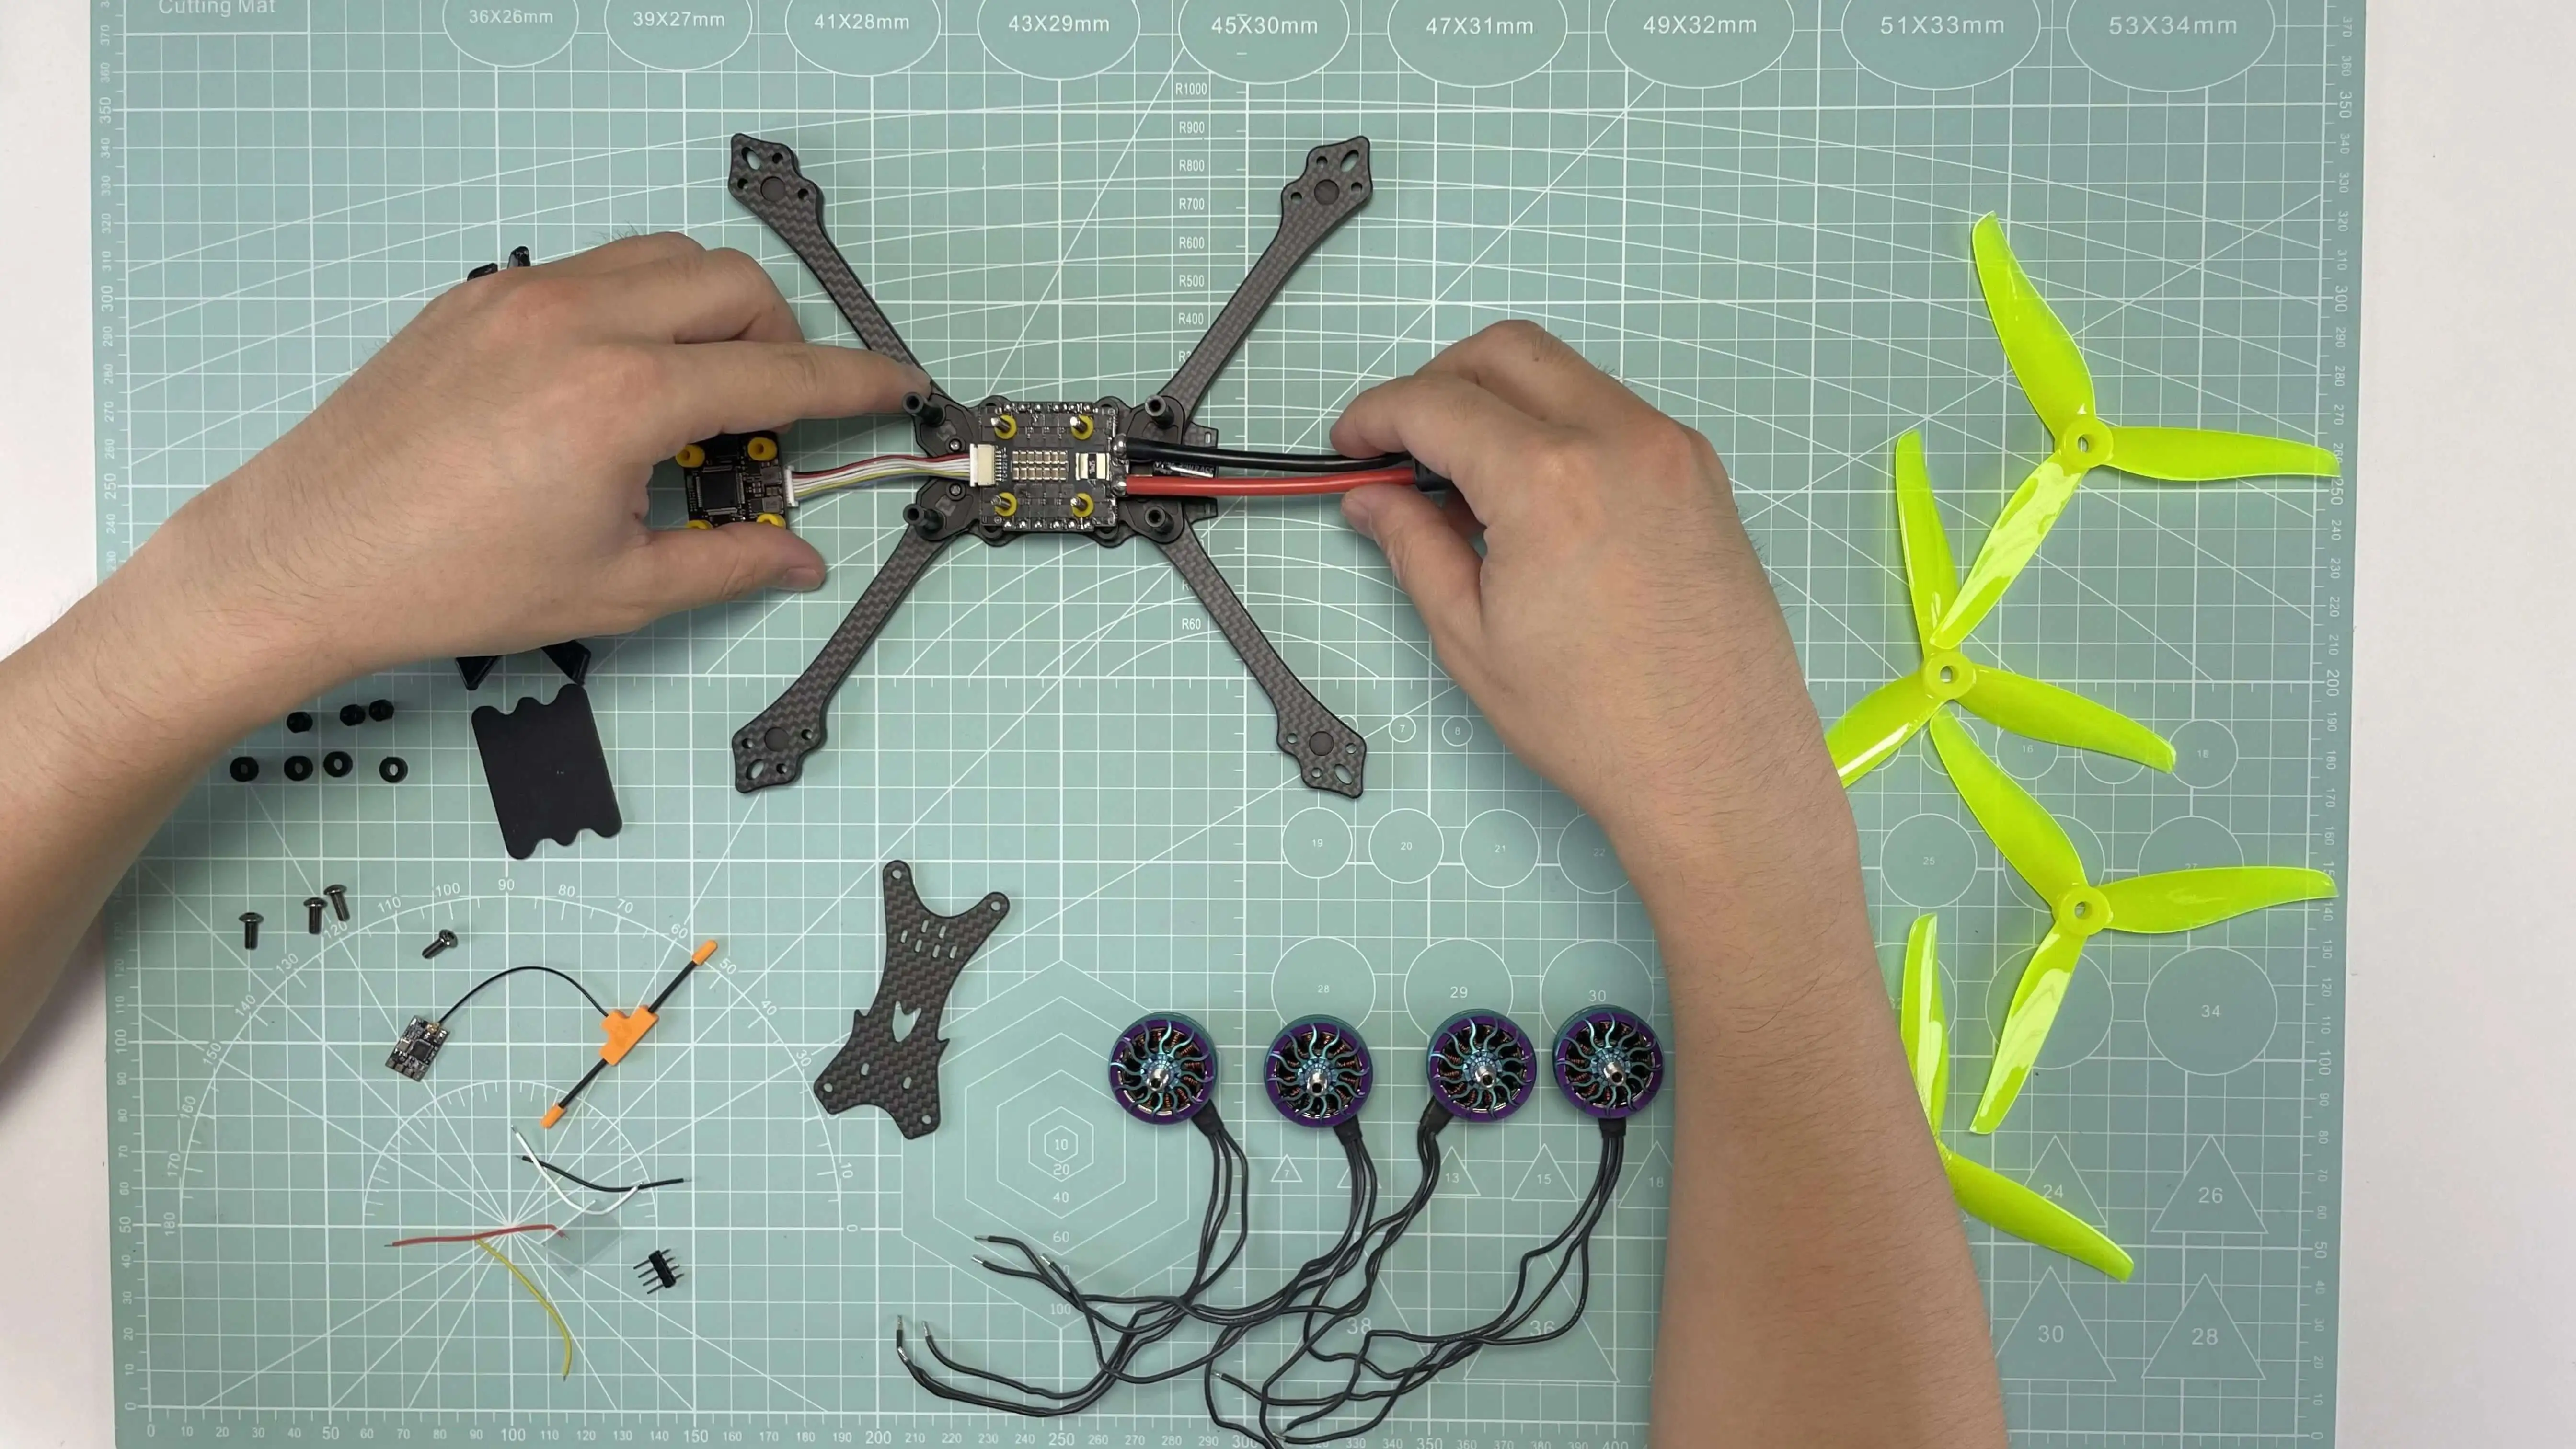
Step 3. Mounting ESC & FC
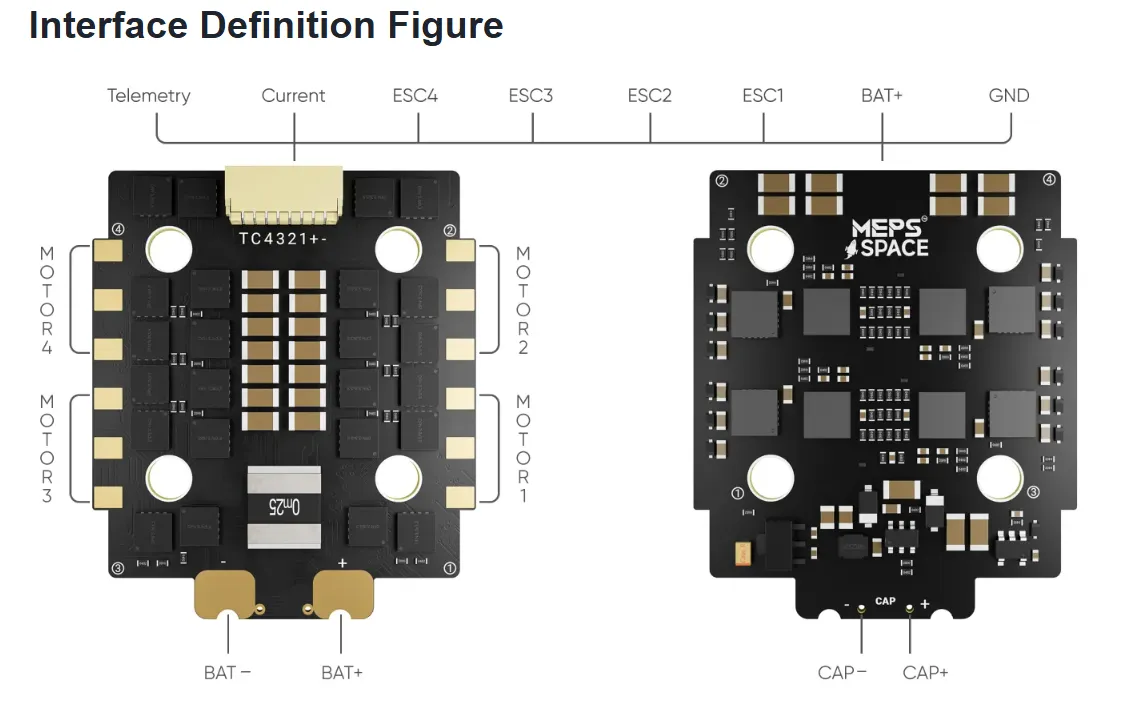
- Mount ESC on soft standoffs on the bottom deck. Align with motor pad layout.
- Mount FC directly above ESC with rubber grommets. Arrow on FC should point forward.
Reminder: Always double-check the pin mapping of your FC-ESC wiring harness. If rotated 180°, motor order must be corrected in Betaflight.
Before tightening everything fully, check:
- USB access
- wire clearance
- stack height
- plug direction between ESC and FC

Step 4. Solder and Mount Motors

Motor Installation & Wiring
- Secure each motor with 4x M3 screws. Avoid overtightening.
- Confirm screws don’t touch stator windings (check inside bell).
- Route motor wires along arms and fix them with electrical tape or zip ties.
Motor Soldering
- Solder the three wires to ESC pads. Direction/order doesn’t matter yet.
- Use short wires for cleaner builds and less weight.

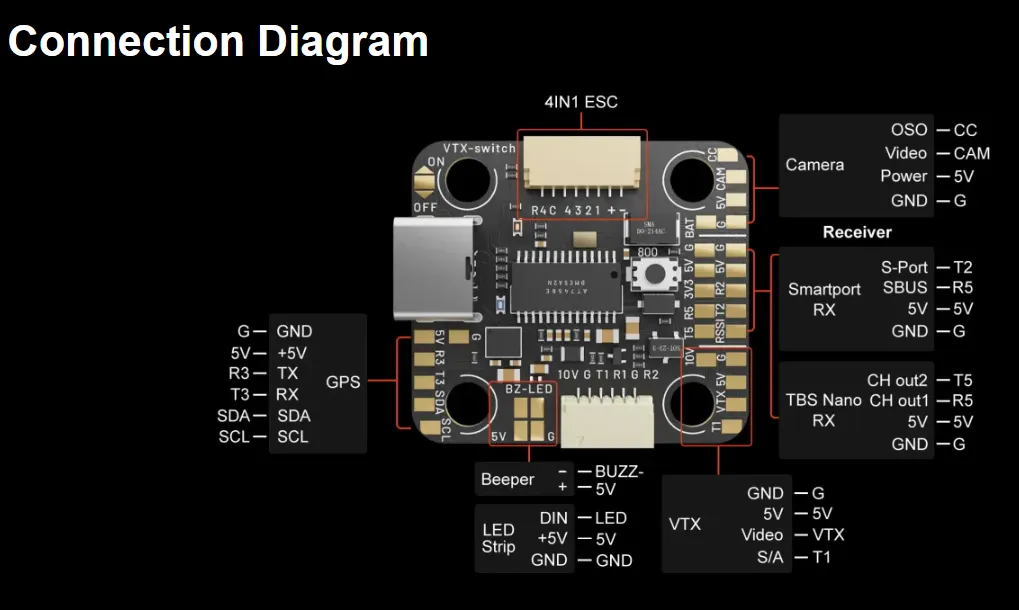
Step 5. Install Camera, VTX & Antenna
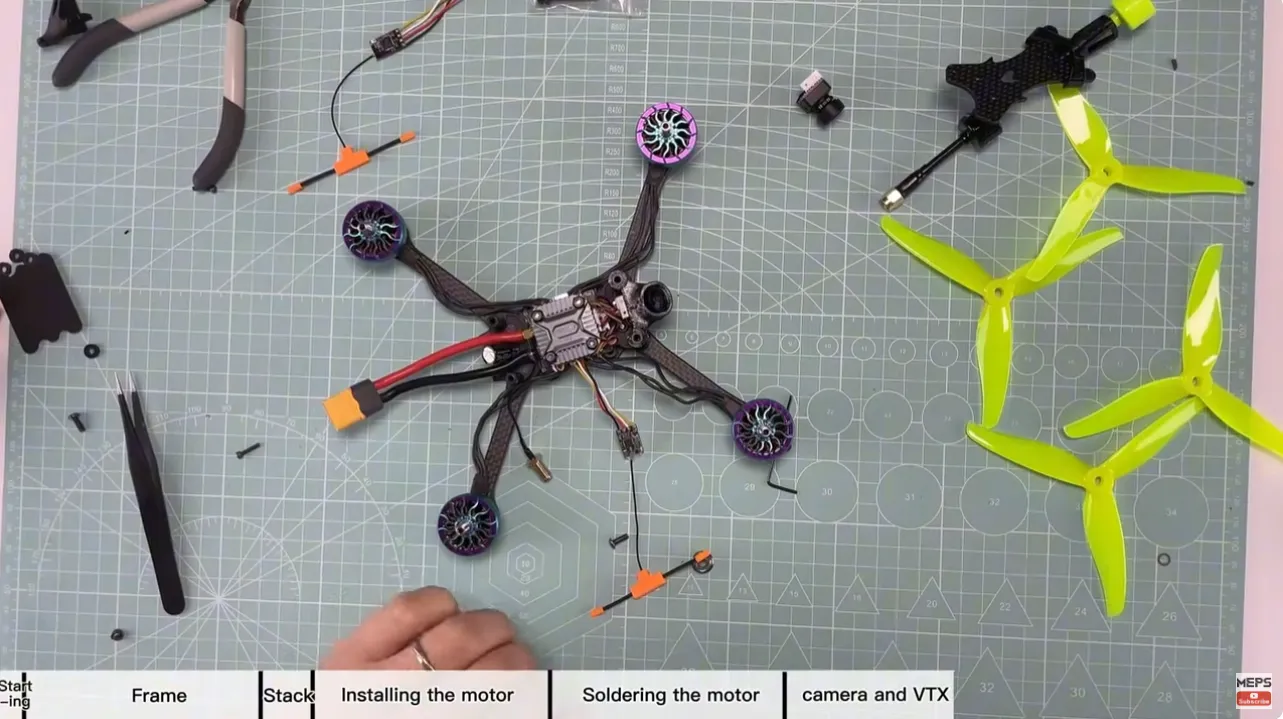
Camera:
For racing, camera latency and visibility matter more than cinematic image quality. And for a racing setup, camera tilt is usually higher than on freestyle builds. Beginners can start around 25 to 30 degrees, but experienced racers often run 35 to 45 degrees or more depending on track speed.
Mount the RunCam Nano securely in the front TPU camera mount.
- Solder:
- Video → FC CAM pad
- 5V → FC 5V
- GND → GND
Tilt angle for racing: 30–45° (start lower if you’re new).
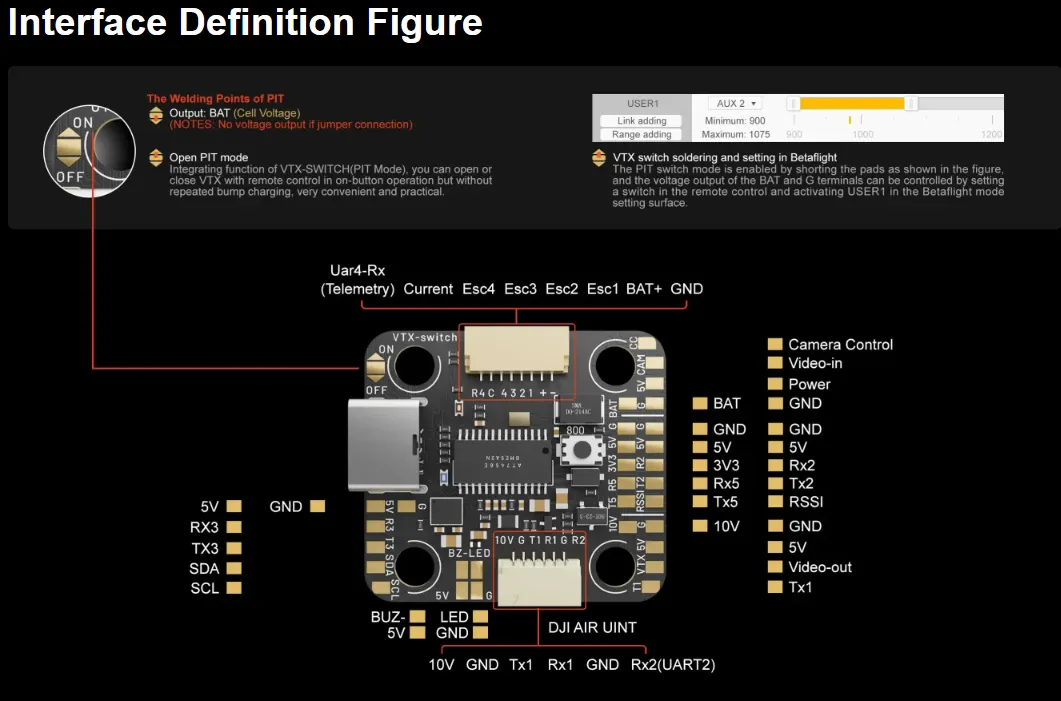
VTX (T-Motor FT800):
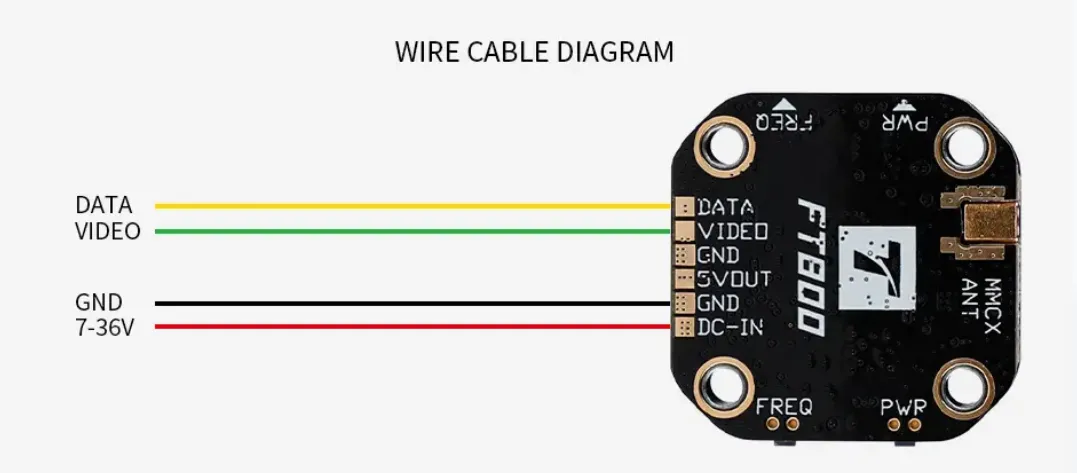
Mount above FC or on rear stack. Connect:
- VTX Video → FC VTX
- 10V or BAT → Power pad (check VTX rating)
- GND → GND
- DATA → FC TX UART (e.g., TX1)
Antenna:
Attach Foxeer Lollipop to a TPU rear antenna mount. Ensure no contact with carbon to avoid signal loss.
Step 6. Receiver (ELRS) Installation
Connect receiver to FC, the wiring diagram is blow: TBS and the ELRS are the same.
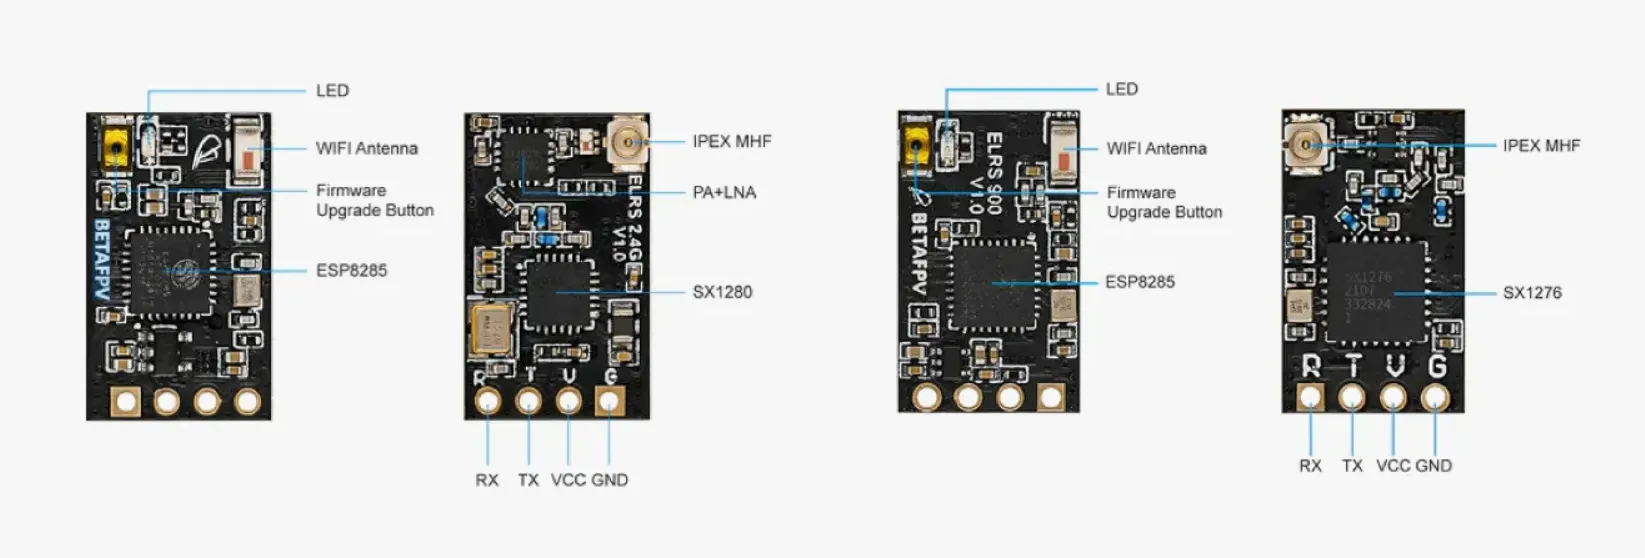
Solder wiring:
- G → Black → GND
- 5V → Red → 5V
- T5 → Yellow → RX
- R5 → White → TX
Mount away from ESC/power wiring for minimal noise. Secure with heat shrink.
Step 7. Install the Top Plate
Before closing the frame, do one full visual inspection:
- solder joints
- stack screws
- FC orientation
- antenna clearance
- motor wire routing
- capacitor insulation
- no wires pinched by the top plate
Then install the top plate.
Tip: Don’t install props during testing.
Step 8. Mounting Propellers & First Flight
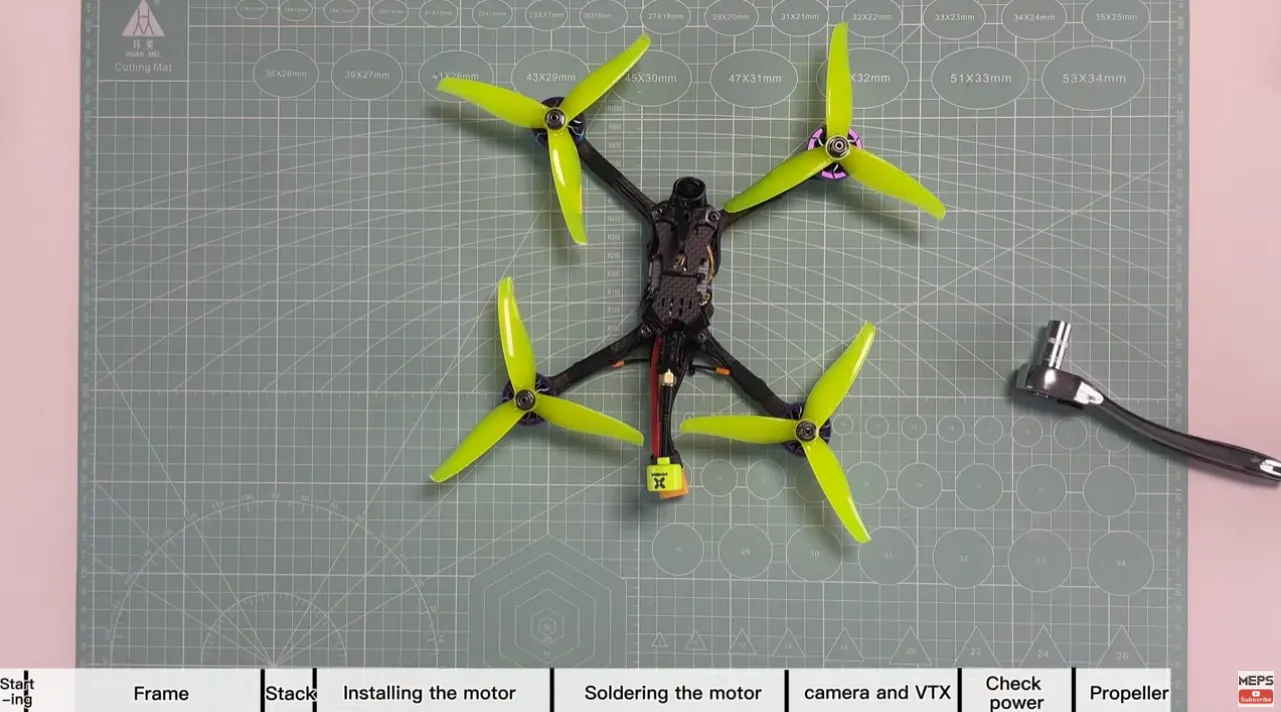
· Mount props: Incorrect prop orientation will cause the drone to flip on takeoff.
- CW on motors spinning clockwise
- CCW on motors spinning counterclockwise
· Secure with M5 nylon lock nuts. Don’t overtighten.
· Power up with goggles and radio on. Verify video and control link.
· Do a hover test. Watch for oscillations, overheating, or signal dropouts.

How to Tune and Configure Your DIY FPV Racing Drone in Betaflight?
A 5-inch FPV racing drone should be configured for clean response, low latency, and consistency under hard throttle changes. The goal is not a soft freestyle feel. The goal is a quad that corners predictably, recovers quickly, and stays locked in when you push it hard.
Step 1. Firmware Flashing & Initial Config
- Connect FC via USB. Flash latest firmware in Betaflight Configurator.
- Set board orientation if needed (e.g., if ESC rotated).
Then immediately check:
- board orientation
- 3D model movement
- gyro function
- CPU load
- basic sensor health
If the quad moves the wrong way in the Setup tab when you tilt it in your hand, stop and fix that before doing anything else.
Step 2. Flight Controller Setup
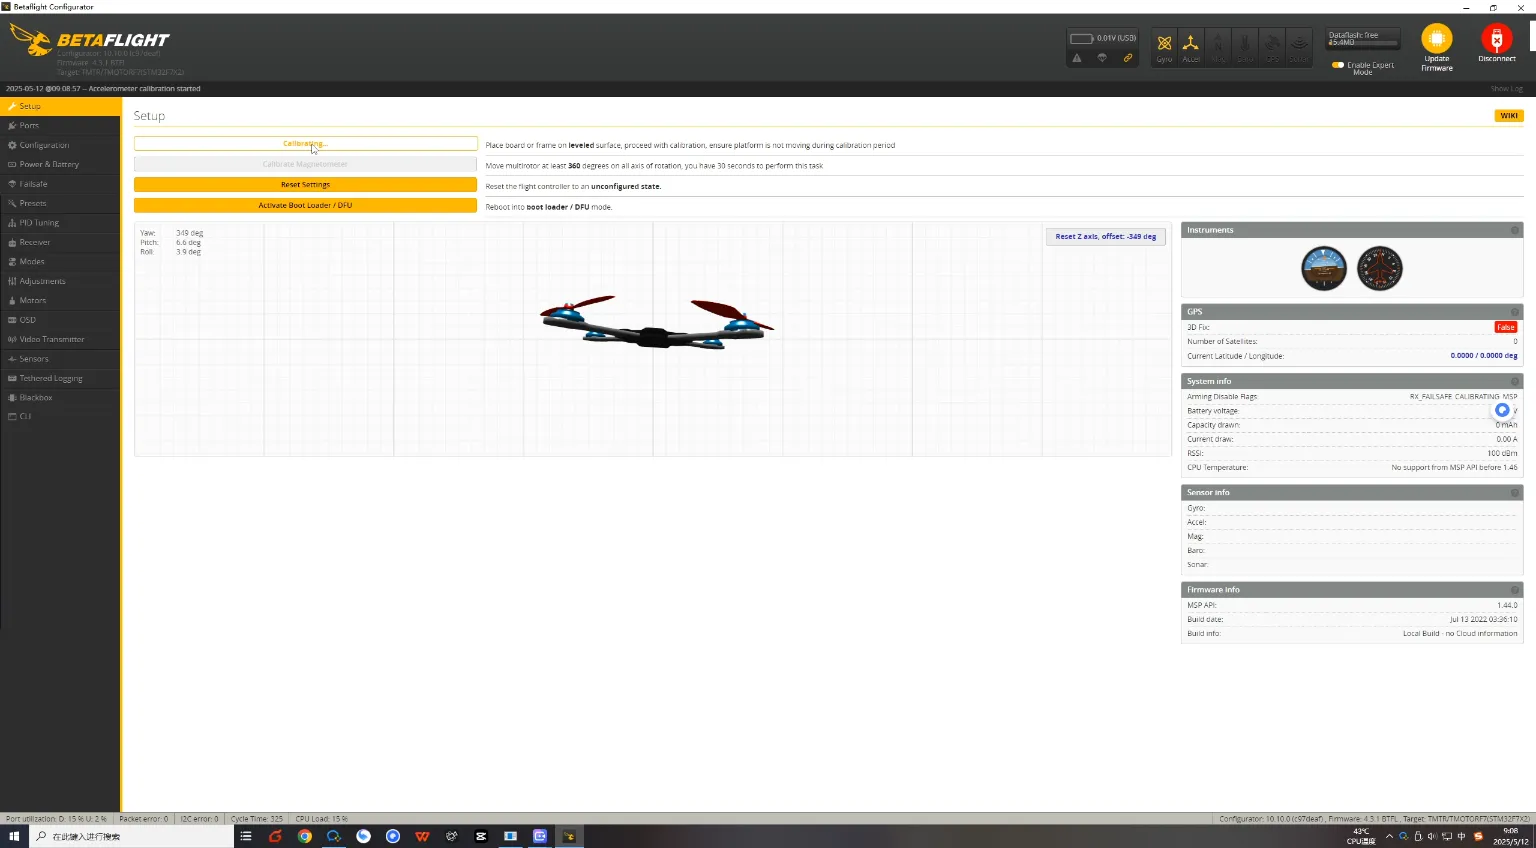
Calibrate the Accelerometer
Once the drone is fully assembled and connected to Betaflight Configurator:
- Go to the “Setup” tab.
- Click on “Calibrate Accelerometer” while your quad is placed flat on a level surface.
This ensures accurate horizon-level reference, critical for Angle mode stabilization.
Step 3. VTX and Receiver Configuration
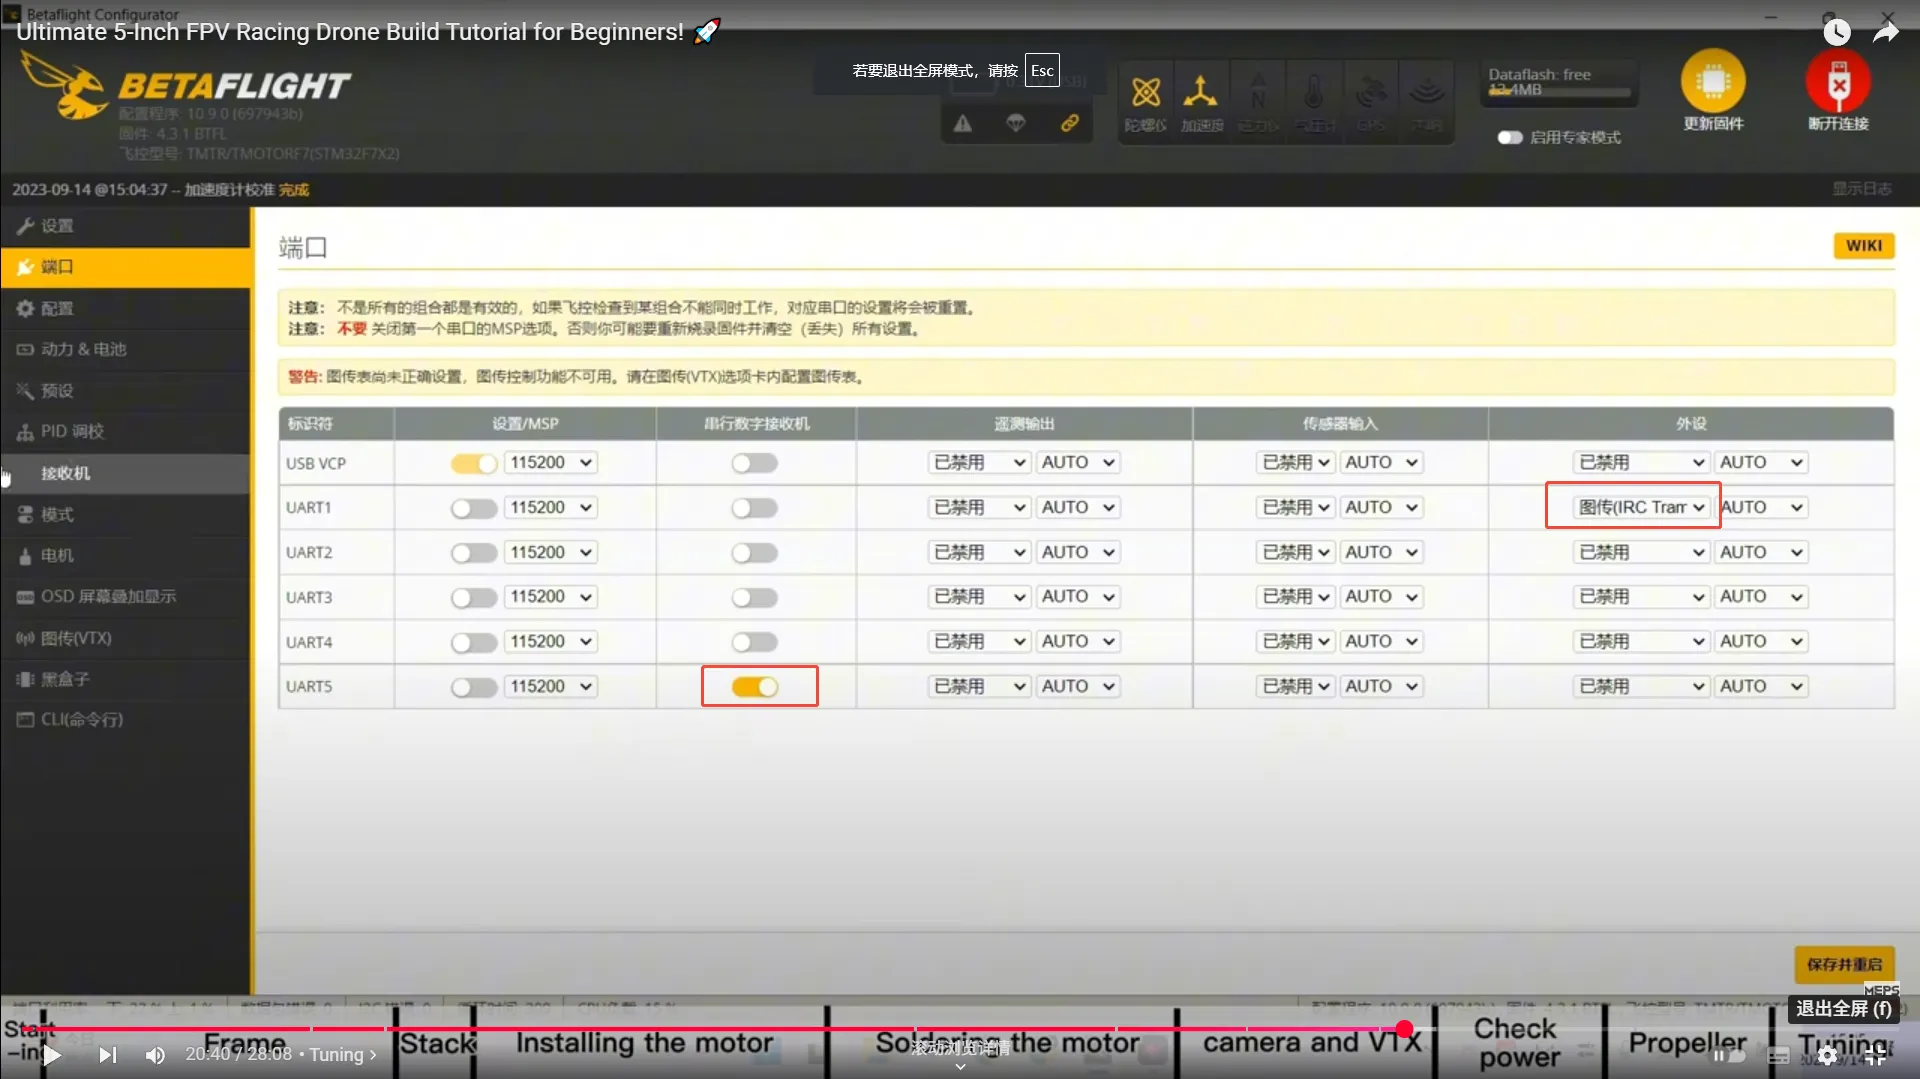
Enable UART Ports
Depending on where you’ve soldered the VTX and receiver on your flight controller, enable the corresponding UARTs in Betaflight:
- In this build:
- The receiver is connected to UART5 (R5) → Enable Serial Rx on UART5.
- The VTX is connected to UART1 → Enable VTX (TBS SmartAudio or IRC Tramp) on UART1.
Navigate to the “Ports” tab in Betaflight and toggle the appropriate functions. Save and reboot the FC.
Step 4. PID Tuning
Default PID Settings
For a modern 5-inch racing drone, Betaflight defaults are often good enough for the first test flights, but racing builds usually benefit from careful refinement after that.
My tuning approach is simple:
- start with a mechanically clean build
- fly on defaults first
- check motor temperature after each short test
- tune only based on real symptoms
For racing, I care most about:
- quick recovery after sharp turns
- low propwash through tight track sections
- predictable throttle feel
- no hot motors after repeated hard laps
A racing tune should feel direct and repeatable, not soft or overly damped.
Step 5. Receiver Binding and Channel Mapping
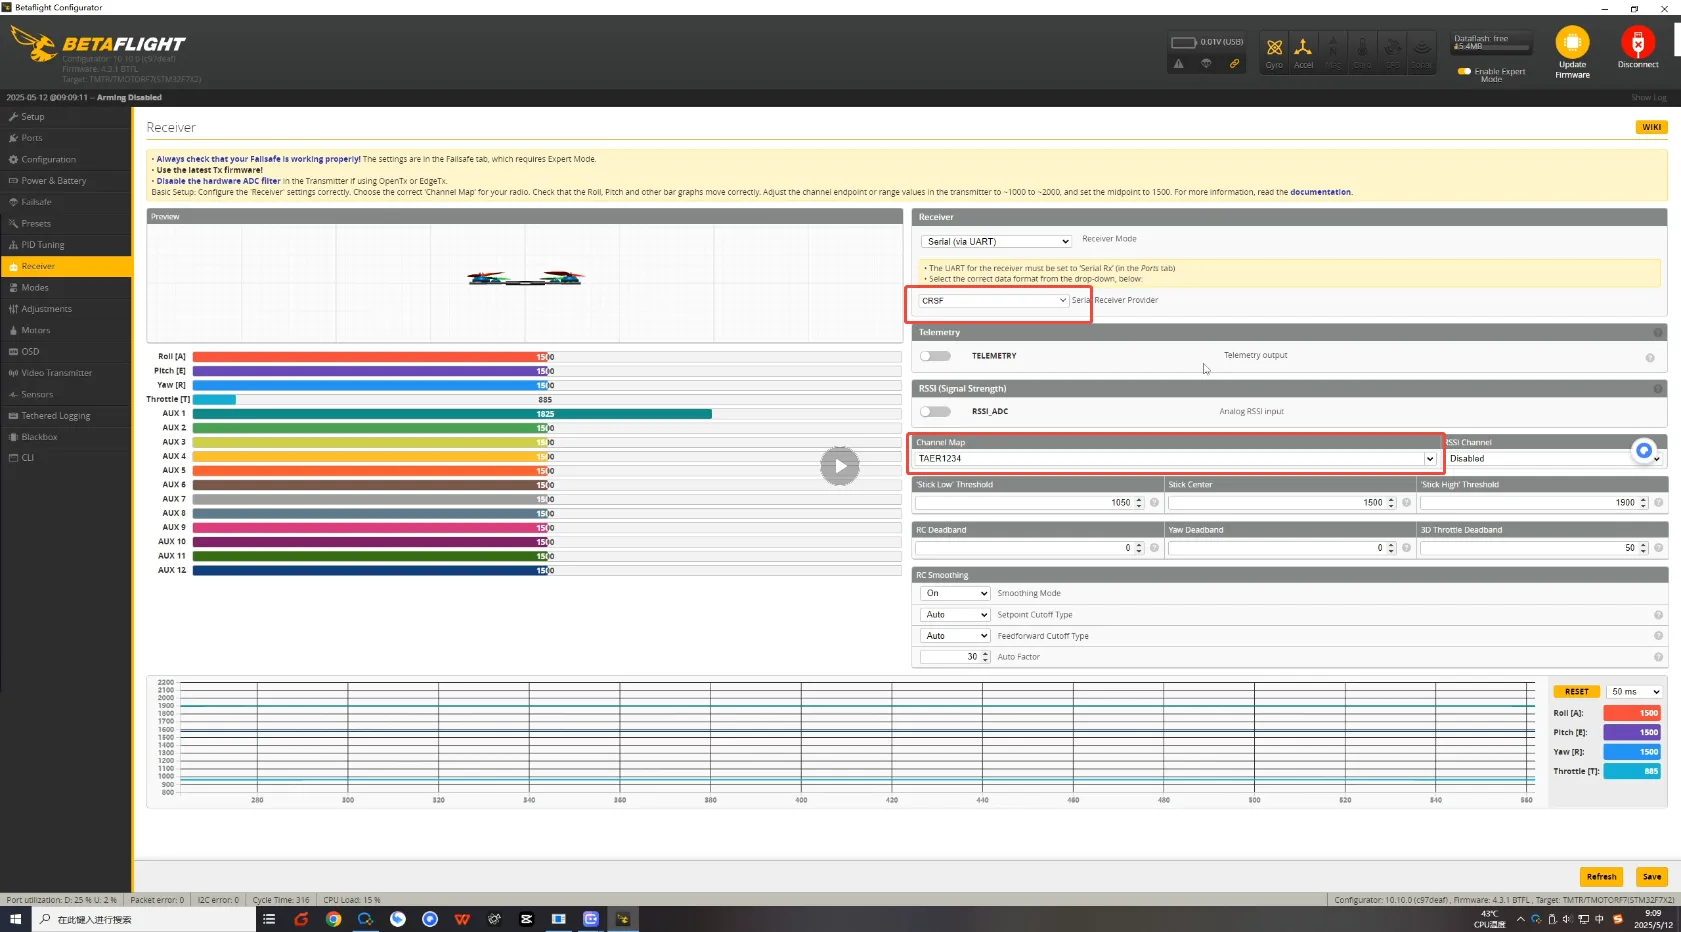
Bind Receiver to Radio Transmitter
- Set the receiver protocol to CRSF (Crossfire) in the “Configuration” tab if using TBS hardware or similar.
- Bind your transmitter to the receiver using the manufacturer’s method (usually by pressing the bind button while powering the RX).
- After binding, go to the “Receiver” tab in Betaflight.
Make sure:
- roll matches roll
- pitch matches pitch
- yaw matches yaw
- throttle matches throttle
- switches behave correctly
If stick movements do not match the correct channel movements (e.g., throttle moving yaw), adjust the channel map (e.g., TAER1234 or AETR1234) until sticks correspond properly.
Step 6. Mode Configuration
Set Flight Modes
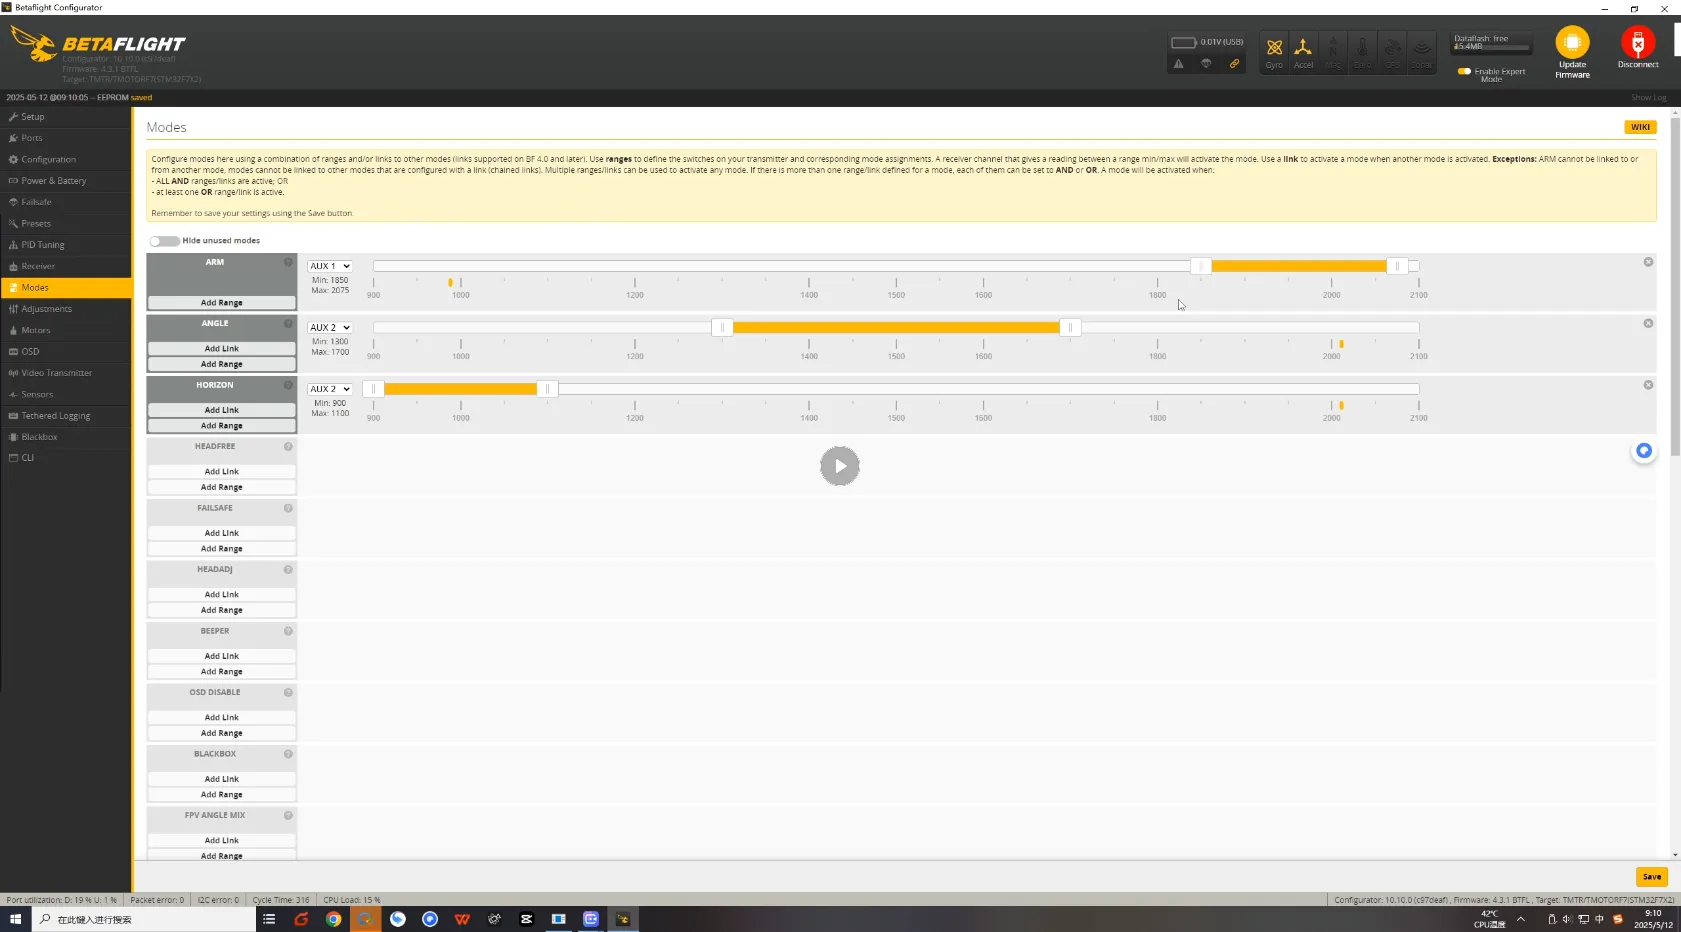
In the “Modes” tab, assign switches to activate:
- ARM – for the motor spinning
- ANGLE – for stabilized flight mode (optional for beginners or testing)
Drag and drop the range sliders for each mode based on your transmitter switch positions.
Step 7. ESC Protocol
Set ESC Protocol
In the “Configuration” tab:
- Under ESC/Motor Features, set the ESC protocol to DShot300 or DShot600. This ensures fast, digital communication with precise throttle control.
Step 8. Motor Setup and Direction Check
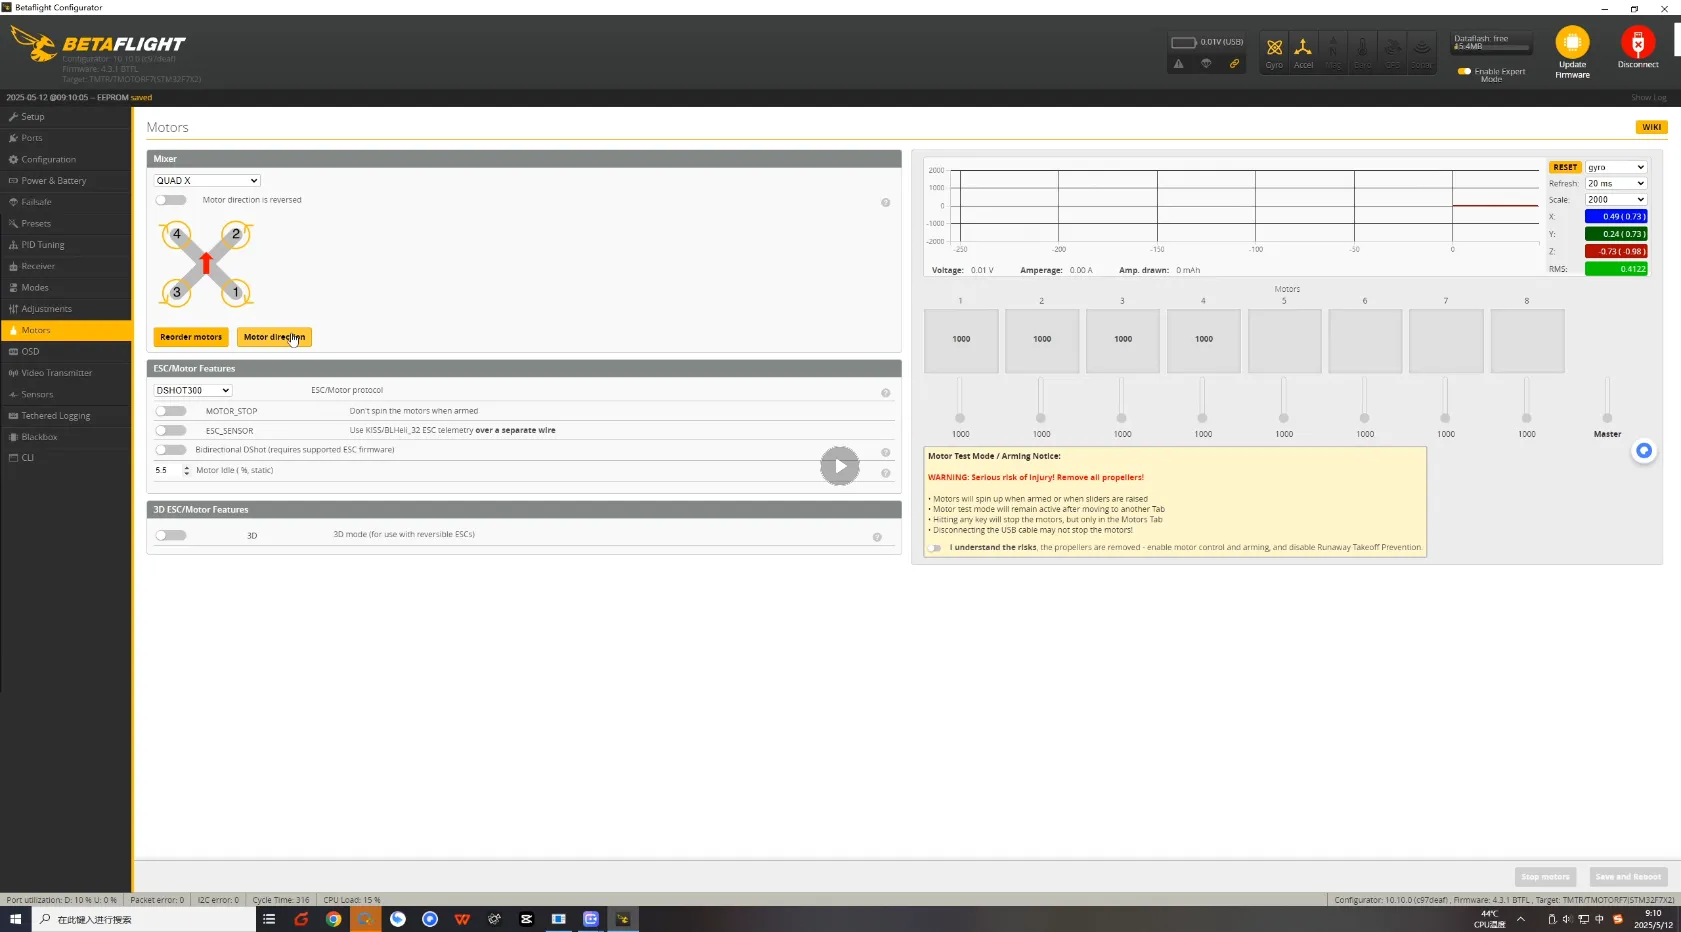
Check Motor Order
Go to the “Motors” tab in Betaflight and verify the motor numbering by enabling the motor test (ensure propellers are removed).
- Motor #1: Rear Right
- Motor #2: Front Right
- Motor #3: Rear Left
- Motor #4: Front Left
If the motor positions don’t match the diagram, use the “Reorder Motors” feature and follow the prompts to correct the motor layout. This may be necessary if the ESC was installed in a rotated orientation.
Step 9. Verify Motor Rotation Direction
Once the motor order is correct, ensure each motor spins in the correct direction:
- Motor #1 and #4: Clockwise (CW)
- Motor #2 and #3: Counterclockwise (CCW)
Use the “Motor Direction” wizard in Betaflight or BLHeli Configurator to reverse motor direction if needed.
Step 8. Final Safety Checks
Use a multimeter to check for shorts before first power-up.
Use a smoke stopper for your maiden power-up test.
Calibrate accelerometer (if needed), especially for ANGLE mode.
#Tip: Troubleshooting Motor Issues
- If no motors spin, ensure the battery is connected and ESCs are properly powered. You should hear ESC beeps on battery plug-in.
- If one motor doesn’t spin, swap it with a known working motor on the same quad to isolate whether the issue is with the ESC, motor, or signal wiring from the FC.
Step 9. OSD (On-Screen Display) Setup
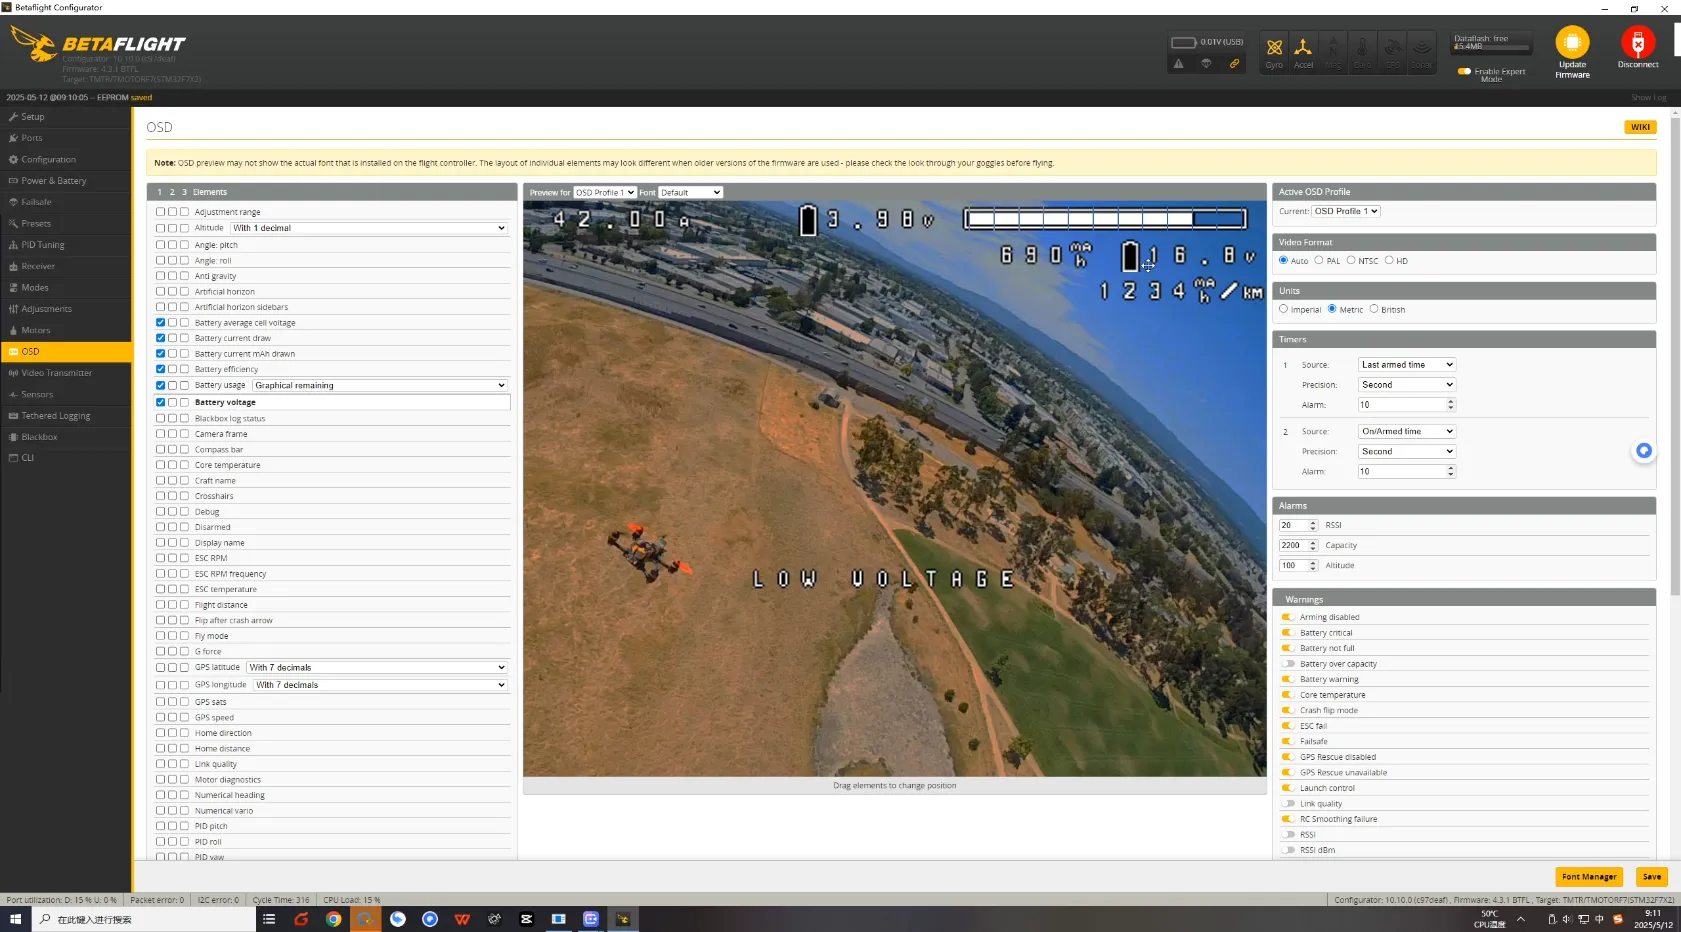
Customize OSD Layout
In the “OSD” tab:
- Enable essential data fields like battery voltage, RSSI, flight time, throttle position, etc.
- Drag them to your preferred positions on screen.
I recommend showing:
- battery voltage
- timer
- mAh used
- RSSI or LQ
- warnings
Make sure the OSD elements are visible and not overlapping in your FPV feed.
Final Assembly
Battery Mounting
- Add a battery pad on top plate to prevent movement in crashes. uts.
- Use 2 x non-slip battery straps for secure hold.
- Center the battery to maintain CG balance.
Your DIY FPV racing drone is now ready for liftoff!
First Flight Tips
For the maiden:
- use a fresh battery
- do a short hover first
- land quickly and check motor temp
- test a short punch-out
- test a few fast turns
- inspect the quad after the first pack
The first flight is not about showing off. It is about confirming the quad is healthy.
Pro Tips of DIY FPV Racing Drone
- Use short motor wires and clean routing for better cooling and aesthetics.
- Balance props before first flight to reduce vibrations.
- Don’t skip the capacitor—it saves your ESC and improves performance.
- Consider conformal coating electronics if flying in damp or wet environments.
- Practice on a simulator like Liftoff or DRL to sharpen your racing reflexes.
Check the guide to learn more about FPV simulators: What’s Free & Best FPV Drone Simulator for Beginner?
Common Build Mistakes
- installing motor screws that are too long
- forgetting a smoke stopper on first power-up
- mounting props before motor testing
- wiring the VTX to the wrong voltage pad
- poor XT60 solder joints
- wrong FC orientation in Betaflight
- wrong motor order
- wrong prop direction
- crushing gummies by overtightening the stack
- trying to tune around a bad mechanical build
FAQs About DIY FPV Racing Drone Kits
Q: How much does it cost to build a 5 inch DIY FPV racing drone?
A good-quality DIY FPV racing drone kit can cost between $250–$450, depending on whether you include HD FPV or analog video.
Q: Is it cheaper to build your own FPV drone?
Yes, building your own FPV drone is often cheaper in the long run. Instead of buying a whole new drone when something breaks, you can simply replace or upgrade individual components. This modular flexibility not only saves money on repairs but also lets you choose parts that fit your budget and flying style — whether you want premium racing motors or more affordable beginner gear.
Q: Is building a DIY FPV racing drone hard for beginners?
Not at all. With proper guidance, it’s a great learning experience. Focus on soldering and wiring accuracy.
Q: What goggles should I use for FPV racing?
For racing drone goggles, many pilots choose DJI Goggles 2 (HD) or analog options like Skyzone Cobra or FatShark Dominator.
Q: How fast can a 5-inch FPV racing drone fly?
A tuned 5 inch FPV racing drone can reach 100+ mph (160+ km/h), depending on motor KV and prop setup.
Q: What’s the best FPV racing drone kit for beginners?
A: Look for a 5 inch DIY FPV racing drone kit that includes frame, motors, and FC for easy assembly and tuning.
Q: What battery is best for a 5-inch FPV racing drone?
A 6S 1300mAh LiPo is one of the most common choices because it gives strong performance without making the quad excessively heavy.
Conclusion: Build Your Own FPV Racing Drone Today
Whether you’re into DIY FPV racing drone kits for the love of flight or want to compete on real FPV tracks, building your own drone is the best way to start. This guide offers a complete FPV racing drone parts list, detailed steps, and Betaflight tuning instructions to get you airborne with confidence.