
When stepping into the world of FPV drones, one of the first pieces of equipment you’ll need to understand is the FPV VTX, or video transmitter. This small but powerful component determines how clearly and how far you can see when flying in first-person view. For beginners, finding the right FPV VTX is crucial — it can make your first flights smoother, safer, and far more enjoyable.
In this guide, we’ll walk you through everything you need to know about FPV VTX systems, explain what to look for as a beginner, and recommend reliable options to get you started on the right frequency. If you want to buy more gear related to FPV, you can go to MEPSKING.
What is an FPV VTX?
An FPV VTX is a device that transmits real-time video from your drone to your FPV goggles or monitor. Without a VTX, you won’t be able to see what your drone sees, making FPV flying impossible. Beginner pilots often underestimate the importance of choosing the right VTX, but selecting a compatible and reliable unit is crucial for both performance and safety.
The VTX determines:
- Range of video transmission: Higher power VTXs can reach longer distances but may require more careful handling.
- Video quality and stability: A good VTX ensures smooth, uninterrupted video feed.
- Compatibility with flight controllers and receivers: Not all VTXs work with every drone setup.
For a beginner-friendly setup, a lightweight, low-power, and multi-channel VTX is usually the best choice.
What Makes a Good Beginner FPV VTX
When choosing your first FPV VTX, don’t get lost in specs. Here’s what actually matters.
Power Output
The VTX power output determines how far your signal can travel.
- 25mW is enough for indoor or small park flying.
- 200mW gives you more freedom for open-field sessions.
- Anything above 400mW is usually unnecessary for beginners and can cause interference.
Start small. Flying line-of-sight distances with 25–200mW helps you stay within safe and legal limits while keeping your setup cool and reliable.
| Power Output | Approx. Range | Beginner Friendly? |
|---|---|---|
| 25mW | 100m | Yes |
| 200mW | 400-500m | Yes |
| 600mW | 1km+ | Not recommended |
Starting with 25-200mW allows you to learn FPV control without worrying about legal limits or interfering with other pilots nearby.
Channels and Frequency
Most FPV VTXs operate on 5.8GHz, which is the standard for hobby drones. A good beginner VTX should offer multiple channels so you can avoid interference when flying near others.
Some modern VTXs also allow you to change channels directly from your flight controller via Betaflight — a huge convenience when tuning your setup.
Size and Weight
Beginners usually start with 5-inch freestyle drones, so a lightweight VTX is ideal. Look for compact designs that fit easily under your canopy without affecting balance. A heavy VTX might reduce flight time and make tuning more complicated.
Compatibility
Always check compatibility with your flight controller and FPV receiver. Many VTXs are plug-and-play with Betaflight setups, but it’s best to double-check voltage requirements before soldering. If you’re using a digital FPV system, ensure it supports your chosen camera and receiver.
Image quality
Although VTX costs can vary widely, your FPV camera—not the video transmitter—is mostly responsible for determining visual quality. In most situations, spending more money on a high-end VTX won’t significantly increase visual quality. However, choosing a video transmitter with superior features and dependable signal quality can improve your flying experience in general.
Signal quality
The positioning and quality of the antennas, as well as the VTX’s accuracy in transmitting at the intended frequency, are the primary determinants of the FPV signal’s quality and range.
Higher-end analog VTXs provide cleaner signals that cause less interference to nearby channels and more accurate broadcast frequencies. Antennas ought to be created and tuned for a particular frequency band. Some digital VTXs come equipped with twin antennas (diversity), which you can mount at a 90-degree angle to enhance signal quality independent of the flight attitude of your aircraft.
What is Analog and Digital FPV VTX Systems?
FPV systems can be divided into two main types: analog FPV systems and digital FPV systems.
The key difference lies in how they transmit signals.
A digital FPV VTX encodes video data into ones and zeros before transmitting it, resulting in higher image quality and reduced interference.
In contrast, an analog FPV VTX continuously modifies the wave’s amplitude or frequency, offering low latency and simplicity.
Analog VTX technology, operating at 5.8GHz, 2.4GHz, or 1.2/1.3GHz, has been the most traditional and affordable solution for FPV beginners.
However, as digital FPV video transmitters like DJI, HDZero, and Walksnail gain popularity, the digital era is becoming the new standard for high-quality FPV footage.
Features of digital FPV system
Digital FPV systems deliver HD video transmission, crystal-clear image quality, and stable connections.
Currently, there are three main 5.8GHz digital FPV systems: DJI, Walksnail Avatar, and HDZero.
Each uses proprietary hardware, meaning cameras and VTXs are not cross-compatible across brands.
A digital FPV VTX (video transmitter) wirelessly sends video signals from your FPV camera to your FPV goggles.
Its main function is to provide stable, low-latency video transmission, ensuring smoother flight experiences—especially in freestyle and cinematic flying.
Features of analog FPV system
The analog FPV system is the original FPV technology that made first-person drone flying possible.
Because it’s open-source and non-proprietary, many manufacturers produce compatible cameras, VTX modules, and FPV goggles.
This makes analog systems highly accessible and budget-friendly.
If you are a beginner or building your first FPV drone, analog VTX modules are still a reliable and cost-effective choice.
They are also lightweight and compact, making them perfect for micro drones and small builds.
| Type | Pros | Cons |
| Analog VTX | Affordable, low latency, wide compatibility | Lower image quality |
| Digital VTX | HD video, clear image, stable connection | Expensive, requires compatible goggles |
Recommended FPV VTXs for Each System
The following will discuss the ideal VTX for each FPV system, HDZero, Walksnail, DJI, and Analog Video Transmitters, in this part, according to the various applications.
HDZero: HDZero Freestyle VTX
The HDZero Freestyle VTX offers up to 1W transmit power, giving it superior range and penetration.
It features dual heatsinks for protection and cooling, making it ideal for freestyle and long-range FPV.
Out of the box, it supports 25mW and 200mW, and can be upgraded to 1W with special firmware.
It supports SmartAudio, MSP Canvas Mode, and 2S–6S battery input.
Walksnail: Avatar HD V2 VTX
The Walksnail Avatar HD V2 VTX is known for its advanced specs and affordability.
It includes 32GB onboard storage, Gyroflow support, and an additional 20x20mm mounting pattern for broader compatibility.
A grounded heatsink reduces GPS interference, while Gyroflow enables smoother, stabilized video.
However, it lacks an SD slot and uses a single antenna, slightly limiting range compared to DJI systems.
DJI:O3 Air Unit
The DJI O3 FPV system is currently the most powerful digital VTX for cinematic and freestyle FPV drones.
It delivers 4K HDR video, long transmission range, and minimal latency.
It combines both FPV transmission and onboard recording functions, making it a hybrid of a 4K action camera and a VTX.
Note: The O3 Air Unit does not support DJI FPV Goggles V1; it’s compatible only with DJI FPV Goggles V2, Goggles 2, and Goggles Integra.
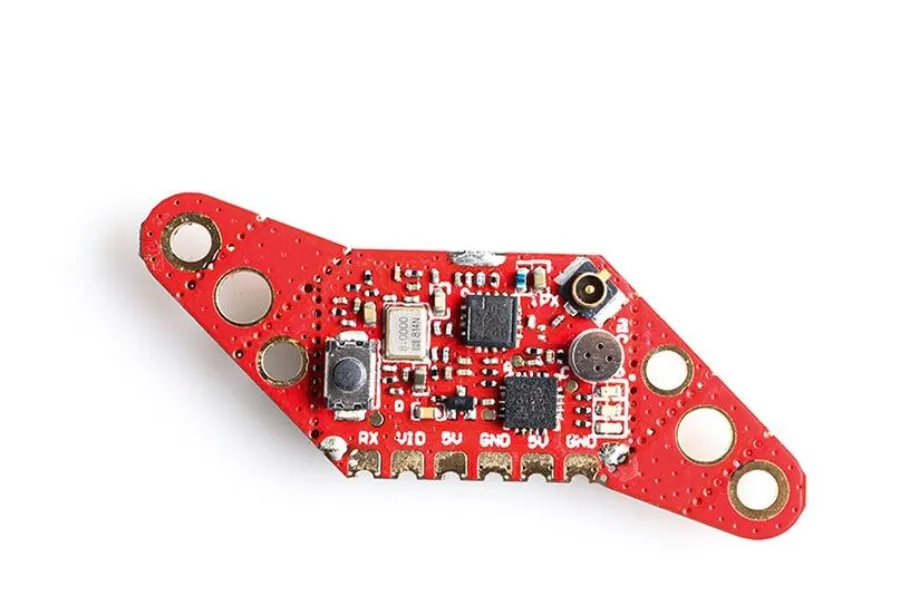
Recommended Analog FPV VTX: HGLRC Zeus Nano VTX
The 800mW high transmit power VTX, which successfully balances performance and price, is a dependable option for analog.
For builds when there isn’t much room in the FC stack for an additional board, the Rush Ultimate Plus is perfect. However, if necessary, a 30.530.5mm adaptor is also included for mounting on top of your FC. The built-in microphone is a benefit because it enables you to hear the motors and beeper through the audio output of your FPV goggles.
For analog users, the HGLRC Zeus Nano VTX stands out as one of the best analog video transmitters available today.
It is ultra-lightweight, features multiple mounting patterns (16mm, 20mm, 25.5mm), and includes a built-in microphone for real-time audio.
This compact transmitter delivers up to 350mW output power, providing a reliable and smooth FPV experience for micro drones and racing setups.
Pros
- Ultra-compact and lightweight
- Built-in microphone for real-time sound
- Multiple mounting options
- Supports Smart Audio
- Up to 350mW transmission power
Cons
- Can overheat under high output power
- Not compatible with every flight controller
Performance and Value
The HGLRC Zeus NANO Video Transmitter performs exceptionally well in terms of video clarity, range, and stability. Its Smart Audio integration allows pilots to adjust VTX settings directly via Betaflight OSD, simplifying configuration. If you’re flying micro FPV drones or small freestyle builds, this is one of the best analog FPV VTX choices for both beginners and intermediate pilots.
Overall, the Zeus Nano VTX offers excellent performance, solid durability, and strong value for its price — making it a go-to choice for analog FPV enthusiasts.
Troubleshooting Common VTX Issues
Experiencing weak or no signal is often due to incorrect frequency settings or a damaged or loose antenna. To resolve this, ensure your VTX and goggles are tuned to the same frequency and replace or secure the antenna if needed. Overheating is another common issue, usually caused by poor airflow or excessive power output. Placing the VTX in an area with better cooling and, if necessary, adding a heat sink or lowering transmission power can help prevent overheating.
Interference with other pilots can happen when channels overlap or when a high-power VTX causes signal bleed. The best solution is to select a clear, non-overlapping channel and lower the transmission power when flying in groups. If there’s no OSD display, the issue could be incorrect wiring or misconfigured flight controller settings. Checking all connections between the VTX and the flight controller and enabling OSD settings in Betaflight should resolve this.
Glitching or static in the video feed can result from loose connections, poor-quality antennas, or external signal interference. Ensuring all connections are secure and upgrading to a high-quality antenna can significantly improve the signal. Additionally, avoiding areas with heavy radio interference will help maintain a clearer and more stable video feed.
| Issue | Possible Causes | Solution |
| Weak or No Signal | Incorrect frequency, damaged antenna | Verify frequency settings, replace antenna |
| Overheating VTX | Poor airflow, high power settings | Improve cooling, use a heat sink |
| Interference with Other Pilots | Overlapping channels, excessive power | Change channels, lower power output |
| No OSD Display | Incorrect wiring, FC settings | Check wiring, enable OSD in Betaflight |
| Glitching or Static | Loose connections, poor-quality antenna | Secure connections, upgrade antenna |
Installing Your FPV VTX Correctly
Even the best VTX won’t perform well if installed poorly. Here are a few essential tips to ensure you get the most from your setup:
- Keep your antenna away from metal parts to prevent interference.
- Secure the VTX with soft padding or double-sided tape to reduce vibrations.
- Use the correct voltage as recommended by the manufacturer. Overpowering the unit can cause it to overheat.
- Allow proper airflow — avoid burying your VTX under foam or tape.
A clean, organized installation not only improves video quality but also makes maintenance easier as you learn.
Practical tips for FPV VTX
Avoid Making Contact With the Frame and VTX Antenna Ground
The SMA antenna connector can be mounted directly to some drone frames thanks to a carbon fiber hole in the frame. However, doing so brings the conductive carbon fiber frame into touch with the antenna ground. Your VTX could possibly catch fire if any live wire comes in contact with the carbon fiber frame. In addition, this contact may allow noise to enter the system backward, which may result in a number of problems, including VTX overheating owing to higher resistance.
Never turn on a VTX without an antenna
Never forget to turn on your VTX without an antenna connected. Without an antenna, when you turn on your VTX, there is nowhere for the energy to go, which results in a buildup of heat inside the transmitter. This much heat can harm the video transmitter over time.
Can FPV VTX Work Under Non-Standard Voltage Conditions
Our flight controllers come in both HD and analog versions. However, the analog version lacks a stable 10-volt power supply. This poses a challenge when using VTX units that require a 10-volt input to function optimally.
In situations where the flight controller can only provide 5 volts, the VTX can still operate. However, due to the lower voltage supply, the VTX may not achieve its rated power output. For instance, a VTX rated for 500 watts might only deliver around 100 watts under these conditions.
The reduced power output can have significant implications, particularly during longer distance flights. Insufficient power may result in signal loss and video dropout, compromising the quality of the FPV experience
To ensure optimal performance, it’s crucial to match the VTX with a compatible flight controller and ensure that the VTX operates within its specified voltage range. This ensures that the VTX can deliver the necessary power output for reliable video transmission.
When selecting components for your FPV setup, including flight controllers and VTX units, it’s essential to consider voltage compatibility to avoid potential issues with power supply and performance. Here is the video about it.
FAQ
Q1: What VTX power output is best for beginners?
A 25–200mW VTX is perfect for most beginners. It offers plenty of range for learning without interfering with other pilots.
Q2: Can I use any VTX with my drone?
Not always. Check your flight controller’s output voltage and video connection type before purchasing a new VTX.
Q3: How do I reduce video interference?
Use different channels from nearby pilots, keep antennas away from power wires, and make sure your connections are properly soldered.
Q4: Should I choose analog or digital?
Analog is cheaper and more beginner-friendly, while digital systems like DJI offer crystal-clear video but a higher cost. For your first drone, analog is a great starting point.
Final Thoughts
Choosing the right FPV VTX is one of the most important steps in building or upgrading your drone. As a beginner, you don’t need high-end specs — you need stability, compatibility, and reliability. The MEPSKING Beginner FPV VTX strikes a perfect balance between affordability and performance, giving you a clear view of your flight and the confidence to keep learning.